How to Prune Apple Trees
 In this article you will find out how to prune apple trees. (One of several articles from the author on how to prune fruit trees). Pruning apple trees can be done several ways. This operation often causes concern, and considerable variation in ideas exists on the subject, generally. Concerning bush trees in the small garden, the following points should be borne in mind. First, one may ask, "what happens if no pruning is done at all"?
The answer is that too much growth may be made, the branches will be too congested and, although fruit will be borne, it may be smaller than it should be. Then, the stage may be reached when growth will slow down, and too many fruit buds will be formed in relation to the new growth. In short, one has to aim at a balance between wood (shoot) growth and fruit bud formation.
If very hard pruning is done after the early years more wood growth than is needed may be produced and fruiting will be delayed. One method of how to prune apple trees to avoid, is the cutting off of all the new growth at the same level each year, i.e. beheading a tree at a given height. This only encourages more wood growth, and gives the tree little chance to make fruit spurs and fruit buds.
How to prune apple trees - Pruning of a young tree:
To start with the pruning of a young tree, after planting, this may have 3 or 4 main branches. The 1-year-old wood (the newest growth) should be cut back half way, to an outward-facing bud. Strong shoots may be cut back less hard, and weaker branches rather harder. Next autumn, or winter, the new growth that arises from this cutting back is treated similarly. Keep only the best two or three shoots that arise from the original branches (leaders) and cut out any shoots that cross the centre of the bush, the aim being to encourage an outward framework of branches, i.e. cup shaped.
The main shoots should be treated similarly for the following years. Meanwhile, the main branches will be furnished with side shoots (laterals) and all these that grow out from the tree (outward that is) can be left their full length. Those growing inwards should be cut back each winter to two buds from the base.
In connection with how to prune apple trees, in the early years, the question of whether fruit formed in the first season after planting should be left or removed, is often raised. If the tree is making good growth. I suggest that a few fruits be retained. To leave many may cause a check in growth.
How to prune apple trees - Regulated System:
A logical stage forward from no pruning is the method known as the Regulated System. This can be followed with standard trees, half standards and strong-growing bush trees, i.e. those on vigorous root stocks. Briefly, with established trees this entails only the removal of crowded or crossing branches, thinning out unwanted shoots, and taking out any dead wood. With this method on how to prune apple trees, sizeable branches have sometimes to be removed, and a pruning saw, with a curved blade is best used for this purpose. The cut surfaces of sawn off branches should be painted over with white lead paint to prevent entry of disease spores.
How to prune apple trees - Spur Pruning:
For established bush trees on the less-vigorous root stocks, the harder method of pruning, called Spur Pruning, is sometimes followed. This, however, is best modified to give a method called the Established Spur System. This is designed to encourage a system of fruiting spurs, close to the main branch-work, and is useful for weaker growing varieties in particular. New lateral growth from the branch frame work is pruned back to two or three buds from the branch. New growth will arise from these buds, which will in turn be pruned similarly the following year.
A spur system of fruit buds will be formed at the base of these shoots which will bear the fruit. These spur systems will need to be thinned out, as they begin to crowd the tree, in order to encourage new growth and reduce the amount of blossom. Some laterals growing towards the outside of the tree may be left to extend naturally; these will form fruit buds and bear the earliest fruit while the spur system is being formed.
Some varieties bear fruit on the ends of the shoots, tip bearers, as they are called, and it is essential to make provision for a certain amount of unpruned wood. These unpruned laterals may be cut back to fruit buds or spurs, when their length demands. In short this method on how to prune apple trees aims at a compromise between hard spur pruning and leaving some laterals unpruned.
How to prune apple trees - Renewal System:
From spur pruning, a further method has been evolved, called the Renewal System. This method which may at first appear complicated to the amateur is, in fact, a successful way of controlling wood and fruit formation to the best advantage. It consists of shortening a proportion of the annual growth in order to produce more wood, leaving some unpruned to form fruit buds. These should be well spaced out over the branch length, to ensure that fruit will not be crowded. The number of laterals, or new growths, to be shortened, depends on the variety and growth of the apple trees.
A strongly growing tree can carry more fruit, therefore perhaps half of the laterals could be shortened and half left untouched. On a weaker tree, which tends to form fruit buds at the expense of new growth, 2 in 3 of the laterals may be pruned. In this system the individual characteristics of the tree need to be catered for; there is no hard and fast rule. Laterals which are pruned to 2 or 3 ins. in length, will form new wood, which is treated as before, either to be left, or shortened in due course.
How to prune apple trees - Cordon Trees:
Basically, these are Spur Pruned; that is, all the young growth, each year, is shortened back to within 2 or 3 buds of the base, where fruit buds will form and a spur system is built up. Space, or lack of it, often dictates that this hard cutting back has to be done, to keep the trees within limits.
A modified system is to leave some of the longer laterals full length and curl them round in a circle, tying them firmly with fillis string to make a loop. These loops will form fruit buds along their length in subsequent years, and may be left intact so long as there is room for them. As others are retained, the oldest may be cut out. Espalier trees may be treated in the same way as Cordons.
How to prune apple trees - Biennial:
Bearing Some varieties of apples tend to produce a heavy crop one year and a light one the next. If one has several trees, this tends to balance out, as all the trees may not have the same "on or off" tendency. If one has only 1 or 2 trees however, biennial bearing could cause a total loss of crop one season, and the trees would be likely to produce a heavier crop than usual the next year, and a lighter than average the following season.
Where this is happening, before the expected cropping year, pruning of new wood should be very light, and spur systems should be reduced. A proportion, say one third, of the blossom should be removed at flowering time. In other words aim at reducing the over-heavy crops. Finally, when you have learnt how to prune apple trees, all pruning should be done when the trees are dormant, i.e. in autumn or winter.
About The Author
Paul Curran is CEO of Cuzcom Internet Publishing Group and webmaster at Trees-and-Bushes.com, providing a range of quality plants, trees, bushes, shrubs, seeds and outdoor garden products.
Website: http://www.trees-and-bushes.com
How to Use a Fire Extinguisher
 Millions of people everyday rely on fire extinguishers to put out minor fires which start in the home. Fire extinguishers contain a powder which is known to instantly put out a fire and prevent it from spreading any further. In 2004, fire extinguishers saved over 25 lives in the United States and prevented over 1,500 injuries. Fire departments all over the world encourage home owners to have at least one fire extinguisher in the home at all times. That said, studies show that approximately 80% of homeowners do have at least one in their home, but the question is do they know how to use it?
Sure it's great to know there's a fire extinguisher close by if you ever need one, but what most people don't understand is if you don't know how to use these devices, they are practically useless. Everyone should know how to use a fire extinguisher and if you are one of the many who don't, the follow steps will provide you with everything you need to know.
The easiest way to learn how to use a fire extinguisher is to memorize the acronym P.A.S.S. and memorize the meaning of each letter. The following list will provide you with the meanings of each letter:
P - The first letter to remember is "P". This indicates to the user to pull the pin. Pulling the pin is the first step in the process and is crucial to the successful execution of fire extinguishers.
A - The "A" stands for Aim. This tells the user to aim the fire extinguisher nozzle towards the base of the flames.
S - The first "S" stands for Squeeze. This advises the user to squeeze the trigger while maintaining the extinguisher in an upright position.
S - The last "S" stands for Sweep. The user will then sweep the extinguisher from side to side making sure to cover the area of the fire completely.
Remembering the word PASS can save the life of you or someone you love.
Having a fire extinguisher in your home is a great idea however the location of your extinguisher is a determining factor in whether or not it will be useful. You will want to keep your fire extinguisher in areas which are most likely to produce fires such as kitchens, near fireplaces, garages or areas with a number of candles (perhaps a bedroom).
Do not keep your fire extinguisher near your stove. Stoves are a prime target for fires and should a fire break out near your stove, you will want to be able to access your extinguisher. You may also want to keep your extinguisher near an exit so you can leave it the fire becomes too large.
About The Author
Jim Staller has worked in the industrial field for more than 15 years. In his spare time, he serves as a contributing writer for http://www.industrial101.com - a site offering information about data aquisition (http://www.industrial101.com/services/data-acquisition.aspx), cleanrooms (http://www.industrial101.com/equipment/cleanrooms.aspx), frequency converters (http://www.industrial101.com/electronics/frequency-converters.aspx) and more.
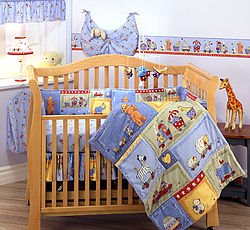
Luxury Baby Bedding - What To Look For Before You Buy
 When buying luxury baby bedding, perhaps first decide what style and fabric you like best. When you decide what luxury baby bedding you want, mix and match colors and patterns on your babys bed. Different flower fabrics mix well with solid or stripe materials, for example, but keep them all in the same color family.
Be sure and consider which fiber is best for your baby bedding. You should be able to find and choose from the following materials when shopping for bedding:
• Cotton - percale, sateen, flannel or organdy. Cotton is a natural fiber that breathes well, and it tends to be durable, easy to machine wash and to dry.
• Linen - linen, damask or venise. Dry-clean this natural fiber to avoid excessive shrinkage. It is a wonderful fabric to use during the summer as it stays cool in warm weather.
• Silk - brocade, charmeuse, chiffon, organza, doupioni or silk satin. This material gives a very luxurious look and feel to your bedroom. Silk is a natural protein fiber that is very smooth to the touch. When washing your silk bedding, be sure and follow the instructions of the manufacturer's label.
• Wool - flannel, felt, jersey, tweed, merino or gabardine. It is another natural fiber, durable and soft to the touch. This type of bedding is usually very warm, and it should be dry-cleaned unless the manufacturer's label says otherwise.
• Synthetic fiber - acetate, acrylic, nylon, polyester.
Thread count in luxury baby bedding is important. Thread count is defined as the number of horizontal and vertical threads that exist in one square inch of fabric. Thread count in sheets can range from 80 to 700 - most are in the range of 180 to 320. Higher thread count in luxury baby bedding does not mean that the fabric will last longer. What it does mean is that you will enjoy a better quality of fabric that also has a softer feel.
Blue and white bedding are classic colors that can be combined with any decor. If you decide to select floral fabrics for bedding, they can go with a traditional or contemporary room decor. Rich and bold colors like blue, red, yellow or perhaps black tend to be used in childrens rooms and teenagers rooms. These are stimulating colors associated with energy, and they will bring drama to any room. Pastels can be mixed with different colors and patterns, and they will give you a relaxing and beautiful room. These colors like pink, blues, light yellow and lilacs are frequently used in luxury baby bedding, nurseries and babys rooms.
Do not be surprised when buying luxury baby bedding that it has a mild crisp feel to it. This crispiness is normal, because manufacturers use starches or stiffening products on the bedding to help it stay wrinkle-free and looking new. When you purchase machine-washable luxury baby bedding or any other type of bedding, be sure you wash it before using it. A great benefit of washing quality luxury baby bedding is that it will become softer and even more comfortable over time.
Make sure to read the bedding labels to be certain the baby bedding materials are flame resistant. And if choosing a baby bedding theme is important, look for nursery bedding collections that come with coordinated accessories. You can save considerably if you can find luxury baby bedding on clearance, even though there will be few or no coordinated accessories. You can use the savings from the baby bedding to create your own baby nursery theme.
Enjoy the process. Later, the child will have their own opinions, but have fun for now! Decorating the babys room can give everyone the chance to add their touch to this special room for this very special person.
Copyright 2005 InfoSearch Publishing
About The Author
Olinda Rola
Read more about finding quality nursery bedding at http://www.yourdreamloghome.com/quilted-nursery-bedding.html plus tips on decorating kids rooms, playroom storage ideas and more. Olinda Rola is President of InfoSearch Publishing and webmaster of http://www.yourdreamloghome.com - a website devoted to your having the very best home possible.
olindarola@yahoo.com
Chill Out With A Quality Ceiling Fan
 Are you craving some air flow in your house? Is the air conditioner running as hard as it can go but it still feels stuffy and hot in your house? Try installing a ceiling fan and see if it will give you some relief. Ceiling fans create air flow in a highly decorative way. They are many different varieties of ceiling fans these days. The choices can be overwhelming. How do you decide what kind of fan and what size you need?
You first need to measure the room where the ceiling fans home will be. Your room size dictates the fan blade size. The small the room, the smaller the blade you will need on the fan. The larger the room, the larger the fan blade you need. For optimum airflow, ceiling fans should be hung no higher than seven to eight feet from the floor. This measurement will dictate the kind of mount you will need to purchase for your fan. The blade pitch dictates how efficiently the fan blades move air. The steeper the pitch the more air the blades will move in your room.
Are you purchasing a fan primarily for air flow or is it going to be the focal point of your room as well? If you are just going for air flow you can choose any fan that blends with your room.
If you want the fan to blend with the room, you probably want to choose one of the ceiling fans that will blend in with your ceiling to avoid taking focus from your room. If you want a great focal point for your room, you are going to be excited when you go to the home improvement store and see the wonderful selection of ceiling fans that are available.
There are ceiling fans for every mood you want to create. They make ceiling fans that look like bamboo fans, shells and many, many other styles. The motor housing's are available in many different materials as well. They are available in brushed steel, white, brass, bronze, copper, wood grain and other finishes. The blades come in many different shapes, as well as materials such as a metal finish, faux wood, bamboo, fabrics and many paint colors.
If you live in location where you see three or four seasons a reversible fan may be right for you. In the summer your ceiling fans can be set to draw the warm air up away from you while in the winter you can reverse the fan blade direction to push the warm air that collects near the ceiling down to where you are.
Did you know that you can save money on your electric bill by using ceiling fans? It is an inexpensive way to save you approximately 10-15% on your electric bill each year. Ceiling fans range in price from around $100 to over $1000 depending upon the finish and style. Ceiling fans can be usually installed in just a few hours using the easy to follow instructions included with the fan or you can pay someone to install it for you. So give it a try and install ceiling fans all through your house!
About The Author
Mike Spencer has been involved with interior decorating for several years, having first got the bug when he designed and decorated his own house. He now offers his own home design tips and helpful advice. Find out more at his site http://www.web-find-it.com/home/index.html Mike Spencer http://www.ceiling-fans-reviewed.com - http://www.discount-ceiling
mick.spencer@gmail.com
How to Build a Home Sauna
 Three Important Questions to Answer Before Building
Considering that home saunas are believed to produce numerous health benefits and provide a relaxing spa experience, it’s no wonder than more and more people want to know how to build a home sauna. The answer to this question depends on several factors, including your budget, the space available, and how handy you are. There are three important questions to answer before you begin building your home sauna.
What Will You Use For Heat?
The first factor to evaluate when planning how to build a sauna is your heat source. Will you use electricity, gas, wood or some other type of energy? Many people consider the wood-burning sauna to be the top choice, especially if you have easy access to wood and no hesitations about burning it.
Wood provides a pleasant aroma and a traditional atmosphere, but obtaining the wood can be quite labor intensive unless you buy it already cut. Before choosing this heating method, it is also important to know if local building regulations will allow a wood stove, and if your home owner’s insurance will cover it.
Electric stoves are most popular with people who don’t have a wood supply available or who don’t want to spend time and money cutting and hauling wood or dealing with ash disposal. Nearly all homes have electricity available already, so it is a convenient heat source for both indoor and outdoor saunas. In addition, electricity is the standard power source for infrared saunas, which produce radiant heat with special electric heaters. If you are interested in infrared saunas, electricity will likely be your heating source.
Gas is usually cheaper than electric and provides a practical choice for those concerned about budgets. It is a clean fuel source and relatively easy to obtain no matter where you live. When using gas as a heating source, it is important to test for carbon monoxide.
Often times, your heat source will determine whether you build an indoor sauna or an outdoor structure. If you use wood for heat, it may be inconvenient and messy to haul wood into the house. And insurance policy may only allow wood heat in a separate, outdoor building. Also, an electric heater requires wiring that may not be available for a large model or outdoor sauna without an expensive bill to an electrician.
Where Will You Put Your Sauna?
Once you have decided how you will generate heat in your home sauna, the next step is to decide where you will put the sauna. As has been mentioned, your heat source may impact where you decide to locate your sauna.
For example, if you intend to heat with electricity, you may not be able to put your sauna down on the edge of the lake without special wiring brought in. If you plan to cut your own wood, you may want to place your sauna close to the woodpile.
In addition, for steam saunas, a water supply is an important consideration when deciding on a location. Indoor saunas may need to have plumbing and drains installed. Outdoor saunas will also need plumbing unless you intend to collect water or haul if from a faucet or nearby pond.
But many of these choices are purely for convenience or budgetary reasons. In reality, your choices for a sauna location are limited only by your imagination, and people have come up with some very creative sauna locations and designs.
In addition to more traditional home saunas built in bathrooms, basements or in separate sauna buildings, people have put saunas on floating platforms in a pond or lake; they have built them on trailer beds, and even in a van or the back of a pickup. Of course these unique plans may require a bit more adaptation or special materials, but the Internet is filled with design plans for all types of saunas from standard to sensational.
What Design Features Do You Want?
Choosing your design is the next step in building a sauna. Do you want something simple that is prefabricated and ready to put together? Or do you want to cut the wood and collect the stones yourself? Are you handy with tools or at least willing to learn? Or would you prefer to hire someone who knows how to build a sauna?
Another design aspect is the size of the sauna. How many people do you plan to accommodate? How big do you want your stove or heater to be and how much are you willing to spend for heat and materials? Do you want a shower area included? How about a room for changing or cooling off? All of these questions will help you determine the size of your sauna, which in turn will impact your overall design.
Infrared saunas and some smaller, standard saunas come as precut kits with the wood, heaters, rocks, or other materials all included. These kits can often be assembled in just a few hours. Many manufacturers will take your dimensions and cut the materials to fit, often including benches and pre-hung doors.
Maybe you want to use an existing design or create one of your own. Brochures from sauna manufacturers and retailers provide good ideas, and staff usually are willing to answer questions. In addition, there are numerous Internet sites that are devoted purely to saunas and related information. Many include design plans and instructions as well as discussion forums to ask questions and learn from others’ experiences. A simple search will bring up both personal Web sites and those from manufacturers.
When deciding how to build a sauna, the wide variety of choices in designs, locations, materials and heat sources make the planning fun, yet essential, to the overall success of the project. The nearly limitless options available in saunas make it easy to find a home sauna to fit any budget, location, and lifestyle.
About The Author
C.J. Gustafson is a professional writer with http://www.saunas-n-sauna-kits.com, providing consumer information on traditional Finnish designs, infrared saunas and portable saunas. She has first-hand experience with the health benefits of home saunas and uses them as an effective treatment for sore, achy muscles after sitting at the computer all day.
Copyright 2005 Saunas-N-Sauna-Kits.com
Stained Glass Can Add Elegance To Your Home
 If there is one way to throw a new light on your home, it's through the stained glass you put in your windows. Whether you want to enhance old windows by replacing some of the panes, or are complementing the new Pella windows you've installed, stained glass can lend an air of grace and quiet elegance to a room.
Where and how you incorporate stained glass into a window treatment depends a great deal on the style of windows you have, and what you want to spend to achieve that multi- colored glow.
In an older home that has wood framed windows with six or nine panes, it's possible to take out the upper row of glass, and replace those panes with new ones cut from older stained glass that can be salvaged from yard sales, flea markets and auctions.
New stained glass that is handmade, can be quite costly due to the craftsmanship that goes into it. That's why cutting old panels of stained glass is a cost-effective alternative, that can give you several panes from one sheet. Even if the glass has small cracks or separations in the colored sections, they are easily repaired.
If you have installed a Pella casement window in your kitchen, a semi-circle of stained glass framed and set into the wall over top, will add jewel tones to the warmth of morning sunlight. Or you might choose to replace the entire bathroom window with stained glass, making it a decorative way to preserve your privacy.
The old and the new can come together in harmony. Take a look at your home and consider whether you'd like to warm up the house with stained glass, or combine it with the sophistication of new Pella windows. It's a pairing guaranteed to create a unique new look.
About The Author
Sarah Peters works at home, and spends most of her free time on various home improvement tasks. Over a few years, she had all her house windows replaced. In this series of articles, she shares her experience and advice.
sarah_article@yahoo.com
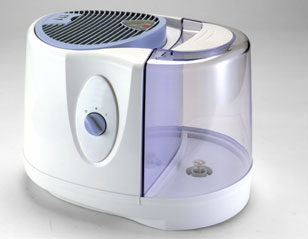
Humidifier Use In The Home
 Humidifiers get a lot of use in baby nurseries. When baby is having a breathing problem due to illness, improving and moisturizing the air will help him/her breathe easier. But, humidifiers are not just for baby.
Very simply, a humidifier puts moisture into the air. This moist air makes it easier for anyone who suffers with allergies, asthma, sinus headaches or swollen nasal passages to breathe. Humidifiers also help prevent dry skin and hair and static electricity in the winter time when the heat is on in the home. Humidifiers can also be beneficial for the home by preventing over drying of wood, peeling of wallpaper, and preventing cracks in drywall and plaster.
Humidifiers can make cool mist or warm mist. A warm mist humidifier has been compared to being in a greenhouse, whereas a cool mist humidifier puts out cool air and will not make the air in the room warm. You will choose based on your personal preference.
You can purchase humidifiers to handle one room, such as a bedroom, or nursery, or purchase a humidifier to handle a large space such as a whole house humidifier. There are many features available on humidifiers. You will probably want to look for a humidifier with an automatic shut off. It will turn off when the unit is empty. This is a good safety feature. Some humidifiers have built in humidistats. This can help when a humidifier is used frequently as they can make a room wet, or over-humidify a room. Some humidifiers come with an ultraviolet light that is used to kill bacteria in the water before it is dispersed into the air by the humidifier. Some humidifiers have quieter motors than others, and this can be important as they are often used while sleeping.
Studies done by the government have shown that cool mist humidifiers can disperse microorganisms and minerals into the air. The EPA suggests that you use a bottled distilled water in your humidifier to help lower the mineral content in the air. Also, you should not humidify indoors to over 50% as high humidity encourages growth of biological organisms, such as mold, in the home. It is suggested you keep the humidity level in your home between 35-45%.
It is very important that you keep your humidifier clean and follow the manufacturers suggested cleaning schedule.
About The Author
Kelly Gillis
Article courtesy of http://www.humidifier-guide.com
support@arundel.net
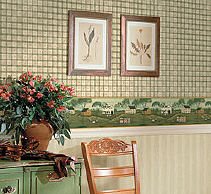
Decorating With Wallpaper
 If you're looking for a unique way to express your individual taste and personality there is no better way to decorate than by using wallpaper. You can take a simple room and make it look stunning and completely different in just a few short hours. You can wallpaper an entire room, or just a portion of the room, in a way that alters the entire atmosphere of the room.
When you use wallpaper you can also hide the conditions of existing walls that have cracks or other flaws. Wallpaper can take a room from boring to spectacular in a way that paint and other decorating techniques can't do. Wallpaper can make a room look bigger or smaller, which is another way that you can change the functionality of the room.
Different kinds of wallpapers can give different effects. Therefore, before starting out on a wallpaper buying trip it is important to decide the type of wallpaper that would suit your walls.
If you're decorating a small room that you want to give the feel of being larger you should pick wallpaper that has small designs or prints on it. For instance, if you're decorating your bathroom you might want to pick a pattern that has small pansies. This will make your small bathroom seem much larger than it actually is. Another technique for making rooms seem larger than they are is to use lighter colors rather than dark colors.
Using large designs and prints in the wallpaper will make a room seem smaller and much cozier. Dark colors will make a space seem smaller than it is so if your goal is to make a large room, such as your basement family room, appear to be bigger you'll want to choose wallpaper that is dark in color.
With wallpaper you can also make adjustments in the perspective of your room. For example , if you are choosing wallpaper for a room that has a low ceiling and you want to create the opposite illusion than you should choose a wallpaper that has either stripes or pattern that flows in vertical lines from top to bottom. Try it out to make your long and narrow rooms look much wider.
Remember that colors greatly influence atmosphere. If you'd like a room to seem warmer, choose wallpaper with warm colors like amber, gold, brick, and soft reds. In other words you want earth tones.
Vice versa in warm climate your requirement is to make the room look cooler. This is also the requirement in rooms that are heated up by direct sunlight. Here you should pick up colours that are reflective of a cool atmosphere such as shades of green and blue.
Hanging wallpaper isn't difficult and isn't too costly either. It's a wonderful tool if you're renovating or changing a whole look. There are many choices in wallpaper types. Choosing patterns and colors will depend on your own preferences and the intended look and use of the room. Any room can be wallpapered. Just take into account that rooms such as bathrooms, that have a lot of moisture, will require a wallpaper made especially for those conditions.
About The Author
Mike Houghtin is the owner and operator of FRE Wallpaper, a fantastic resource for information about wallpaper, For questions or comments about this article why not visit:
http://www.frewallpapers.com/articles
http://www.frewallpapers.com
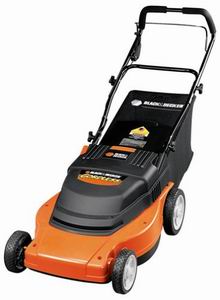
8 Simple Tips to Keep Your Lawn Mower Running
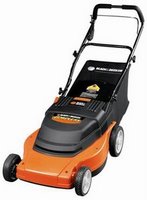 1. If you have a non-electric mower which runs on petrol or gas have a look in the instruction manual to find out how to check and change the oil. Check the oil level often, add more oil when necessary and change it when it’s dirty.
2. Store the lawn mower in a shed or in some kind of protective environment so that it isn’t sitting in the elements.
3. Check your lawn mower to see if it contains instructions for sharpening your mower blade. Some lawn mowers do encourage you to sharpen the blade and others do not. If the manual does direct you to sharpen the blade then do so frequently.
4. The best time to mow your lawn is after any dew from the night before has had time to evaporate. This means that the late afternoon is usually better than the morning as the grass cuts better when it’s dry and the humidity has left the air. Also, wet grass can cause problems with the mower and generally just makes a bigger mess!
5. Try mowing your lawn in different directions each time you mow. This will help keep your lawn healthy and will reduce the likelihood of any patterns forming over multiple sessions.
6. Make sure you keep the fuel and oil that you pour into your mower as free of foreign objects as possible. No matter what your daughter insists, her bottle of moisturizer added to the gas tank will probably not make your lawn mower run any better.
7. Take the time to clean the grass off the underside of the mower from time to time. Make sure the mower is off before you attempt to clean the underside. Make sure if you are going anywhere near the blade you disconnect the spark plug wire first.
8. Clean the air intake for the mower. Combustion (petrol or gas) engines need some type of air intake to run correctly and if the air intake on your mower is clogged with grass then the mower won’t run at peak efficiency.
About The Author
Sarah June
Lawn Domain offers free information, articles and tips on how to keep your lawns, mowers and tractors in tip top condition. Find out more at http://www.lawndomain.comCreate An Incredible Lawn In Just 4 Days. How to create an incredible lawn in 4 days.
How to Buy a Porch Swing
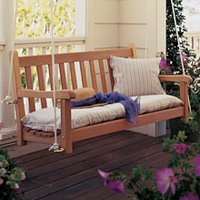 The Porch Swing is enjoying a surge in popularity thanks to the latest Home & Garden trend towards building "Garden Rooms". Patio Furniture Retailers have responded by flooding the market with so many options that making a choice can be a daunting task. Here are some factors that you should consider to help you make the best Porch Swing choice for you:
Porch Swings are now made from a wide range of building materials. The most common are wood and wicker. Popular woods used are cedar, teak, pine, maple, and oak.
The materials vary greatly in terms of strenth and durability. While Oak is the strongest, it also tend to be very heavy. Cedar offers the greatest strength to lightest weight ratio. It is very light and has 80% the strength of oak. Cedar also has natural properties that enable the wood to resist rot and decay. In addition, it won't bow or sag, crack or chip making it one of Outdoor Furniture's most desired building materials. Pine is lightweight and relatively inexpensive but is soft and dents and cracks easily. The durability of wicker varies depending on the materials used to make the wicker.
Porch Swing physical features like seat depth, angle of the back and space between the slats, length of the seat, and joint construction can vary widely. Seat depth can range from 18 to 36 Inches. There is no one correct depth. It's a personal choice based on comfort.
For maximal comfort, the back of the Swing should be slightly tilted. And there should be some space between the slats to allow air to circulate.
Swings can generally hold one to three people depending on the length of the seat. But keep in mind that the longer the seat the heavier the supports that will be required. Generally, a Porch Swing that seats two comfortably is recommended.
Finally, the functional nature of Porch Swings requires that the joints be screwed or bolted together. Joints that are nailed together are not recommended as a Porch Swing is a functional peice of and the nails will come loose with use.
Another factor to consider is whether to buy a finished or unfinished Porch Swing. Porch Swings are now available in a variety of finishes. Some are stained, others painted in colors ranging from white to a rainbow of multiple colors. Many Porch Swings are also unfinished. The unfinished Porch Swings provide the most options later and some can be left to age naturally without finishing. Unfinished Cedar, for example, is "Outdoor ready". No finishing is required. An unfinshed Patio Furniture Porch Swing also leaves lots of "dress up" options. While it might be difficult to find cushions to match muti-colored Porch Swings, by starting with an unfinished Outdoor Furniture swing, you can pick the stain or paint to match the cushion!
Installion is another important consideration. If you have a covered Porch with exposed joists, your installation job is automatically made easier. However, your options re: length and weight of the Porch Swing may be limited. If you intend on building your own Porch Swing support for the garden or an uncovered porch, more options are open to you as you can build the support according to the weight and length of the Porch Swing.
By considering the building material, physical features, the finish, and your particular installation requirements in advance, your task of choosing the Porch Swing that is best for you will be much easier. And you'll be enjoying your Porch Swing that much faster with fewer hastles!
About The Author
Kevin Snook is the operator of Patio Furniture retailer http://www.GoCedar.com. Porch Swing (direct link: http://www.gocedar.com/product.i?sku=PS48U&size=big) that's shipped free to homes and cottages in the USA and Canada.