Popularity of Latex Mattresses
 The mattress market is seeing a dramatic shift in the way people are buying beds. More and more people are seeing that the right bed can play a key role in being well rested and ache free.
Consequently they are turning away from their conventional innerspring mattresses which create pressure points that cause tossing and turning in search of a better alternative. Tempurpedic has poured money into advertising their viscoelastic memory foam mattresses, fueling interest in spring free mattresses.
People who are allured by the intrigue of the “space foam” are often unfulfilled by the lifeless feel of memory foam, and begin searching in a new direction. As a result latex mattress makers are experiencing a substantial boom in sales.
Latex international, the top US manufacturer of latex mattress components and latex pillows, is currently generating sales around $80 million a year showing an average increase of approximately 30 percent a year since 2001. With high end mattresses showing an industry average increase of roughly 20 percent, latex mattress producers are ahead of the curve.
This astounding and steady increase in sales is not because of some ingenious new marketing scheme, it simply reflects the consumer response to a quality product. Latex mattresses provide a sleeping surface that relieves pressure points better than memory foam.
They are naturally dust mite resistant and anti microbial, which makes an incredible difference to people who suffer from allergies and asthma. Unlike other mattresses on the market today latex mattresses are biodegradable, and are made from natural, sustainable resources. With an average life span of 20 years, nearly twice those of other beds, latex mattresses outlast the competition.
Looking to the future this trend has no end in sight. With the price of polyurethane foam recently jumping a whopping 55% due to factory closures, the margin between premium latex mattresses and other mattresses narrows giving latex the clear advantage.
About The Author
Ben Hermsen, a latex mattress and foam cushion engineer, is a manager for http://www.foamsource.com where he champions the benefits of latex mattresses, toppers and pillows for both individual health and also the preservation of our natural environment.
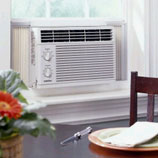
Air Conditioner Buying Tips
 Most new homes today have air conditioning units. It is more unusual to see homes without central air then to see ones with it nowadays. Air conditioning can be a necessity in warmer climates for the comfort of the family. Most air conditioner units will range from three to six thousand dollars, including installation. This is not a minor investment but one necessary for comfort. If you need a new air conditioner, there are several things to consider prior to purchasing.
Air conditioning units should be installed by a contractor who is experienced with this type of work. Depending on existing ducts and the type of unit purchased, the price may vary greatly. Get several estimates from qualified contractors before deciding on the unit and installer. Ensure the contractor has experience and works well with you. Get references and check them thoroughly.
Air conditioner units use electricity to run. If the unit is used often this can increase energy costs significantly. This is especially true in warmer climates where it is a necessity to cool the home. To help combat these costs, it is advisable to look at the efficiency of the unit. This may mean a larger initial investment, but should save money in the long run.
The efficiency rating is required to be on all air conditioners. Compare units carefully to determine the cost for each type of efficiency. The more efficient a unit is, the more money you will save on energy bills. A more efficient air conditioner will take less energy to run and cool the entire house.
You will need to determine the appropriate size of the unit needed for your house. This is an important step because units that are too small will have to work harder to cool the home. Units that are too large are simply wasteful and unnecessary. A qualified air conditioner contractor will be able to analyze the size of your home and make recommendations on the size needed.
Always get a contract before starting work with any contractor. Make sure all the costs are clearly spelled out. This should include both the cost of the unit and installation. It should also detail payment policies and warranties. Warranties generally cover the compressor and additional parts. Do not choose a unit that has anything less than a five year warranty on the compressor, but a ten year warranty is better. Additional parts may be warranted anywhere from one to five years and are usually separate.
About The Author
Gray Rollins is a featured writer for AirConditioningZone. To learn more about air conditioners, please visit http://www.airconditioningzone.com/ and http://www.airconditioningzone.com/central/.
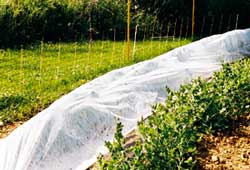
How and Why To Use Row Covers
 Row covers are a matter of choice for gardeners. Some love them. Others hate them. If larger and more earlier yields of veggies is a goal then row covers are an excellent choice.
Row covers come in a wide variety of materials and can be used as tunnels supported by hoops or as floating covers which just lie gently on the growing plants.
The lightweight covers are used for keeping insect pests away from your plants while the heavier ones are used for frost protection in both the spring and fall.
Whether used with hoops or free floating the edges of the covers need to be weighted down to prevent them from blowing away in the wind and to prevent insect pests from getting under the covers. Weigh the edges down with rocks, bricks, or anything handy. A row of soil placed on top of the edges is an excellent and simple method.
Although studies show that most plants do best with hooped covers there are three plants that require hoops. Tomatoes, peppers and squash grow large and fast. These plants do best with hooped covers because the constant rubbing of the cover on the plants can damage the growing points and break the large leaves.
Added benefits of using row covers include:
Earlier and larger yields. Plants produce 1 to 3 weeks earlier than without row covers.
Frost protection of 4 to 7 degrees. Especially in the fall when the soil is much warmer than it is in the spring. Just one layer of row cover gives the added protection of moving the garden by one USDA growing zone.
Pest protection as long as the edges remain weighted down or buried.
Moisture Retention. The soil doesn't dry out as fast under the row covers as the temperature isn't as high as without the cover, and water under the row cover condenses and returns to the plants and soil.
Wind damage. Plants under row covers suffer less from high winds.
For more information on gardening with row covers visit: http://www.apluswriting.net/garden/rowcover.htm
Copyright: 2006 Marilyn Pokorney
REQUIREMENTS FOR REPRINT: You have permission to publish this article free of charge in your e-zine, newsletter, ebook, print publication or on your website ONLY if it remains unchanged and you include the copyright and author information (Resource Box) at the end. You may not use this article in any unsolicited commercial email (spam).
You may retrieve this article by:
Autoresponder: rowcover@getresponse.com
Website: http://www.apluswriting.net/articles/rowcover.txt
Please leave the resource box intact with an active link, and send a courtesy copy of the publication in which the article appears to author.
About The Author
Marilyn Pokorney
Freelance writer of science, nature, animals and the environment.
Also loves crafts, gardening, and reading.
Website: http://www.apluswriting.net
Email: Current address on website
Bed Pillow Buying Guide
 Size:
Size:
Most pillows come in 2 sizes: Standard and King. King size pillows can be too long and unyielding, so you may want to consider using 3 standard pillows instead of 2 King Size for a King Size mattress. Some companies offer a Queen Size pillow which is often a happy medium between the other 2 sizes.
Sleep Position:
The position you normally sleep in is a major factor when deciding what pillow you want to purchase for yourself. Back sleepers normally need thinner pillows, while a side sleeper could use some extra support to keep their neck properly aligned. Contour type pillows work well for either situation. Stomach sleepers need to be careful not to get a pillow that is too thick, so they don't suffocate on the pillow.
Filling:
If you prefer a very thin Pillow, Down or synthetic Down would work fairly well for you. If you prefer a supportive pillow, memory foam or latex would suit you well. Memory foam will react to your heat and the weight of your head and slowly conform around your head and neck to provide great support. Latex pillows are more bouncy than memory foam and bounce back faster. If you move around a lot, a latex pillow would be better for you than memory foam. Memory foam normally takes 30 to 60 seconds to go back to its natural shape and moving during that period could force you to wake up.
Firmness:
Pillows offer different levels of firmness. With a Down pillow you can get one that is very thick or very thin. Which you would choose is based on your preference and how you sleep. Memory Foam Pillows come in different shapes, firmnesses, and densities. For a pillow, 3 lb. density seems to work best. It is soft, yet supportive. Remember that we are talking about pillows and not a mattress. What is good enough to support your head is not necessarily best for your entire body. A contour pillow can be arranged to suit you no matter how you sleep. A comfort or standard shaped memory foam pillow is normally a memory foam shell with small clusters of memory foam inside. This is our favorite pillow due to its level of softness and conformity. A latex pillow is very supportive and conforms without a memory. That means that it will bounce back to its original shape immediately and works well for someone that moves around a lot.
Covers:
The cover you would use for your pillow depends on the pillow itself. Memory foam pillows normally come with a removable, washable cover. A pillow case is not necessary when these covers are included and honestly the memory foam will react to a person faster if one is not used. Latex and standard type pillows should be covered by a pillow case to keep it from becoming stained. Make sure you keep the manufacturer's cleaning instructions in case your pillow gets dirty.
The Bottom Line:
With any type of bedding purchase, the bottom line is preference. You would be best off testing every pillow you can think of and deciding for yourself what you like. This guide should help to steer you in the right direction.
About The Author
Ross Goldberg is a disabled veteran of the Desert Storm Era. After being diagnosed with Fibromyalgia, Arthritis, and Permanent Nerve Damage, he purchased an expensive memory foam mattress for himself. Upon using it he became obsessed with understanding why it cost so much. What you are reading is the result of years of research and comes from a true expert in the bedding industry.
http://www.memoryfoamfurniture.com
http://www.memoryfoamuniversity.org
Using Mirrors in Home Decor
 Mirrors provide a special touch in home decor by adding light and creating the illusion of space. A mirror is defined as a reflecting surface that forms an image of an object when light rays coming from that object fall on the surface.
According to the Encyclopedia Britannica, the typical mirror is a sheet of glass that is coated on its back with aluminum or silver that produces images by reflection. This type of mirror came into widespread production in Venice during the 16th century.
Here are ten tips for using mirrors in your home decor:
1. Place a mirror on an adjacent wall to an interesting picture or piece of artwork and the mirror will reflect the image and add a sense of space.
2. Hang a decorative mirror near a window in a dark room. This will allow the light to reflect off the mirror creating more natural light in the room.
3. To create the illusion of depth in a room, paint one wall in a dark, contrasting color to the other walls. Then hang a decorative mirror on the dark wall to create a sense of depth in the room.
4. Create a charming entryway by hanging up a framed mirror topped with a floral swag. This will help to create light in the entryway as well as providing a last minute check before heading out the door.
5. Expand a small dining room by placing an ornate mirror on a wall. This will make the room appear larger and brighter.
6. Place a decorative mirror opposite an attractive fireplace and mantel to reflect something interesting in the room.
7. Group and hang several mirrors of assorted sizes and shapes for an attractive wall display.
8. Add mirrors (such as mirror tiles) to the backs of bookcases to add a sense of depth.
9. In the kitchen, add mirror to the countertop’s backsplash. This will reflect light while preparing food and it is easy to maintain.
10. Place a custom sized mirror on the top of a piece of furniture that is damaged or not very attractive. This can be done on dressers, tabletops, coffee tables, and end tables just to name a few.
Always be sure to analyze the placement of mirrors before hanging them up. For example, placing a mirror above a fireplace mantel may reflect the unattractive tops of furniture or blank wall space. You can angle the mirror down so that it reflects something more attractive in the room.
In addition, place mirrors so they will not cause unnecessary glare in a room. Mirrors can be unappealing if they are placed across from a window with a southern or western exposure.
As you can see, there are numerous ways to use mirrors to brighten and enrich your home decor. Decorative mirrors can be found in flea markets, retail stores, home improvement stores, and on the internet in price ranges to fit all budgets.
About The Author
Lesley Dietschy is a freelance writer and the creator/editor of The Home Decor Exchange. The Home Decor Exchange is a popular home and garden website featuring resources, a shopping marketplace, articles, decorating pictures, decorating advice, free projects, and more. http://www.HomeDecorExchange.com
Keeping Hard Wood Flooring Looking Its Best
 Hard wood flooring remains a popular choice in home decorating. The warmth and beauty of hardwood adds to the value of your home. You have a variety of choices in colors and styles of wood. There is an option for every home from traditional to contemporary.
Choosing Hard Wood Flooring
You have several choices in styles for the overall look of your hardwood floor.
o Plank style flooring material is wide and resembles several strips of wood together in one plank. The planks are between three and six inches wide. The benefit of planks is the installation is a bit faster, since the planks cover a wider area than individual strips.
o Strips are smaller, up to three inches wide at most. These are beneficial for making the room appear larger.
o Solid flooring is one large piece of wood. These vary in thickness and are a custom made floor. They can be refinished many times over the life of the floor.
o Parquet floors are squares of hardwood that resemble ceramic tiles in size. Some are glued and others are nailed down. The squares can be arranged in a geometric design for a unique look.
Your other major choice in hardwood flooring is to get one that is unfinished or come pre finished. Pre finished floors come with a factory finish. These are very popular and easier to install. However, they are more expensive. Many find the additional price worth the money, as it saves time in staining and sanding.
Unfinished flooring must be finished after the floor is installed. You stain and coat the wood with urethane to protect the finish. The sanding and finishing process takes several days. You need to allow sufficient time for the surface to cure at each stage in the process before sanding. The floor must be sanded after each stage of the finishing process. Floor sanders can be used for this process.
Installing Hard Wood Flooring
Proper measurement is essential when ordering materials for your room. You will need a saw to cut the planks of wood to fit around corners and through doorways. For a more professional look, remove all the baseboards and trim before you start. Replace these after the installation is complete. The seams should be staggered as the planks are laid.
Before the installation process is started, be sure the subfloor is level. This should be done for any floor including hardwood, bamboo flooring, cork flooring or pergo flooring. If the floor isn’t level, use asphalt tiles to level it prior to beginning the installation.
Special paper can be used under the hardwood to avoid squeaking sounds when you walk on the floor. The planks should be nailed through the subfloor and into the joists for a stable floor that won’t move. Start the installation in the center of the room and move outward for the best, most even look.
Once the floor is laid, it needs to be sanded. Floor sanders can be rented through home improvement centers or any store that rents tools. Sand the floor evenly and don’t stay too long in any one area of the room. This can cause uneven spots.
Keeping Hard Wood Flooring Looking its Best
The care needed depends on the finish on your particular floor. Refer to the manufacturer’s directions regarding the care of pre finished floors. If your floor is finished with urethane, sweep a few times each week to remove dirt and dust. Wipe spills with a damp towel, but don’t use a very wet mop. This can damage the floor.
If the floors are waxed, you will need to buff occasionally and wax the floor. Using area rugs and door mats can help keep the floor from becoming very dirty. Protect the wood with pads on the legs of all your furniture. This will help prevent scratches and damage to the wood.
About The Author
Rob Carlton is a freelance writer for http://www.inside-woodworking.com a website with resources. The author is publishing about hard wood flooring ( http://www.inside-woodworking.com/flooring/hard-wood-flooring.html ) and other areas in this field.
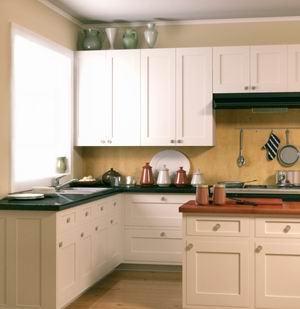
Simple Ideas to Organize Your Kitchen
 The kitchen is often known as the heart of the home. It is the place where we gather to eat, cook, entertain, and spend time with friends and family. As a result, the kitchen can become one of the most difficult rooms to organize and keep clean. Try some of these tips and time savers to organize your kitchen and simplify your life.
Countertops:
• Clean your countertops and remove any item or appliance you do not use at least once a week.
• Keep cookbooks to a minimum and store away the ones you don’t use on a regular basis.
Pots/Pans/Containers:
• Store pots and pans in a cabinet beneath or next to the stove for easy access.
• Place baking sheets, cake pans, pizza pans, etc. in a cabinet beneath or next to the oven. You can use a rack to help arrange baking sheets by size and those used most often.
• Consider suspending pots and pans on a wall or from a ceiling mounted rack to maximize cabinet and storage space.
• Store microwave safe containers in a cabinet near the microwave. Arrange containers by size and stack one inside of the other if possible. Throw away plastic containers that are no longer used.
Pantry:
• Store each item so that it is easily handy and visible.
• Group canned goods together and stack so that their labels can easily be seen. Discard canned goods and jars that have passed their expiration dates or are more than a year old.
• Place pasta, cereal, rice, and other dried foods in labeled plastic storage containers.
• Store gravy packets, seasoning packets, etc. in a small, clear plastic tub for easy access.
• Line up boxes with their 'spines' facing front (like library books).
• If possible, store the most often used items at eye level.
• Choose a lower shelf for paper storage and place all napkins, towels and plates together.
• Store heavy items, such as boxes of soda and juice, on the floor or on a lower shelf.
• If you have extra wall space, consider hanging up storage hooks, a hand vacuum, a bulletin board or other helpful organizing items.
• Purchase handy space saving products such as stacking containers, caddies to store foil and wax paper, and sturdy baskets for onions, garlic and potatoes.
• If you have school-age children, create a snack shelf of parent-approved treats.
Refrigerator:
• Designate certain shelves in your refrigerator for specific items. For example, use your top shelf for beverages, your bottom shelf for leftovers, place produce in its drawer, and place condiments in the door of the refrigerator.
• Delegate one day of the week to tossing out old foods. Consider cleaning out your refrigerator on the same day you go to the grocery store. Since you will be adding new items in your refrigerator it is a great time to toss out old food to make space.
Spices:
• Organize spices on a spice rack and place the ones used most often in the front row.
• If you have a shallow drawer near your stove, consider laying all of your small spice jars in there. Place them label side up so it is easy to view them all at once.
• Most dried spices lose their flavor in six months. Discard any spices that are older than six months or you no longer use. To keep track of the freshness of spices, write the purchase date or throw away date on the bottle with a black marker.
Misc.
• Consider recycling products to help organize your kitchen. You can label shoe boxes and use them to store items such as cookie cutters, candles, appliance accessories, etc. You can also use checkbook boxes to store items such as matches, batteries, and smaller items.
• Square containers take up less space and fit more efficiently on shelves than round ones.
• Place hooks inside a cabinet door to hang cooking utensils on. This will help to clear drawer space.
• If you have school age kids or someone who carries their lunch to work, create an area in your kitchen for lunch-making. Stock it with lunch boxes and/or brown bags, plastic wraps/bags, thermos, quarters and small containers.
• Utilize bins and baskets to keep “like items” together.
• Store trash bags near or in the bottom of trash can for easy changing.
By using some or all of these tips, you can be well on your way to a more organized kitchen.
Happy Organizing!
About The Author
Lesley Dietschy is a freelance writer and the creator/editor of The Home Decor Exchange. The Home Decor Exchange is a popular home and garden website featuring resources, a shopping marketplace, articles, decorating pictures, decorating advice, free projects, and more. http://www.HomeDecorExchange.com.
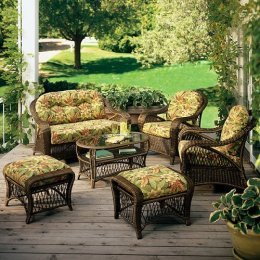
Time To Build That Deck You’ve Always Wanted?
 Outdoor patios and decks are great summer projects. Imagine being able to come home from work, get a nice tall glass of something cold, and sit out on your deck or patio and enjoy the view. It isn’t as difficult as you might think, and probably less expensive than you anticipated.
With all of the things that cloud our life these days, computers, electronic gadgets, television, and cellphones, to name a few, it’s nice to create a place where quiet and beauty are the focus. It adds an escape that adds tranquility to an otherwise hectic lifestyle. You won’t know how you ever did without one once yours’ is built.
In this article, I will help you explore a few different options for this type of home improvement. Decks and patios add value to your home, so besides the enjoyment you will get from this add-on, you will also reap the benefits of adding monetary value to your property.
Before you tackle this project, you need to plan it well. Don’t take the simple square deck approach. When most people think of a deck, they think of a flat, square platform on stilts. Today’s decks are much more than that. There are so many options, the planning stage will not only be the most important part of the project, but it will also be the most enjoyable.
Think of all of the activities your deck can be used for first. Sunbathing, cookouts and barbecues, entertaining guests, parties, and just relaxing and enjoying the view are some things that immediately come to mind. How much space will be required for you to get the full enjoyment out of your deck?
Are you going to place a hot tub out there? A barbecue grill? Patio furniture? Tables? An area for your favorite games and activities? An area closed off for your children? You will save a lot of money in the long run if you plan your deck for all the things you might use it for before you begin building it.
You can always add on to your deck later if your budget won’t allow you to build your dream deck all at one time. But if you have the option, do it right the first time. So make a list of what activities you want to have on your new deck. Draw out a rough sketch on paper that outlines the different areas you will be considering.
Consider the different possible shapes that would accommodate your different areas and that would enhance the beauty of both your deck and your home. Keep in mind, special shapes do require more work and possibly more expense. However, it might just be worth it so you have exactly the deck you want.
Once you have decided all of that, you will now need to attend to some details. First, of course is, will you be building it or will you be hiring a contractor? Next, what permits do you need from your city or county to build a deck attached to your home? What requirements come with those permits. Termite protection is one of the requirements in most places, for example.
If you are going to hire a contractor, they can most likely help you obtain all the necessary permits and they should already know what requirements will come into the process. If your contractor advises you not to go to the expense of obtaining a permit, tell them you won’t be needing their services. The headaches you will have down the road due to not having obtained the proper permits for building your deck are not worth the money you might save now.
Now you, or you and your contractor are going to have to decide on the materials your deck will be made of. Some are made of just treated lumber, others are made of redwood, still others are made of cedar or a variety of other woods.
The region you live in and your climate will probably have a lot to do with your choices. You want something that will last. If you choose the cheapest lumber, you have a cheap deck. You get what you pay for, so choosing the type of wood your deck will be built from is an important choice.
If you are going to build your deck yourself, you will still need permits and there are a lot of how to guides out there that can help you with each stage of the process.
Building it yourself will give you an enormous sense of pride and even more enjoyment knowing you built it. However, it requires skills you may not have. I don’t advise you to build your own deck if you are not familiar with building and carpentry in general.
I hope this article has helped you learn at least the basics of getting your deck project going. A beautiful deck is one of the greatest additions you will ever have for your home. Enjoy your new deck!
About The Author
D. David Dugan has a website, http://homeimprovement.divinfo.com to help homeowners find all the information they need about remodeling, home repair, building decks and carports, room additions, and more. He also actively participates in an article directory at http://www.articlemotron.com that has current and up to date information on many topics
Coffee Tables, End Tables, and Sofa Tables
 No living room or dining room is complete without a nice set of tables. The type of tables you choose greatly depends on the theme of the rooms. There are many wonderful materials to choose from. There are also options for every price range.
Styles can range from very simple straight lined architecture to much more ornate and decorative. Simple styles are great for a contemporary living space that minimizes decorative objects and focuses on functionality of design. These types of tables can be stacked and look great that way, or can be stack and spread around when ready for use. Ornate decorative tables are for a more traditional type of setting. Rooms that use floral fabrics, and other decorative furniture, the traditional coffee and dining tables are more appropriate.
Recycled or pressed wood materials are used to achieve the same look as real wood. Using these types of materials makes the tables more light weight and easier to move around. Other materials used include real hardwood like maple or cherry that will be much heavier. Using these materials makes the tables much more durable, but may require additional maintenance to preserve the beauty of the wood. With recycled non-wood materials, all you need is a mild cleanser.
If on a budget, it is still possible to get quality tables that are still pleasing to the eye. Logically, tables made from non-wood materials are much less expensive than those made of hardwood material. If money is not really an issue and the buyer is selective, there is a huge range of options that will enhance the living space.
Whether you choose to go high end, or choose something more practical for short term use, the tables will add dimension and functionality to your living space. Coffee tables will always come in handy for guests, they can be decorated with furniture accessories, or they can be practical, using them for reading material, or when entertaining as a setting to place food. Gathering around a coffee or sofa table is an intimate experience that you cannot achieve around an ottoman.
About The Author
Michael Hargrove is an author for Patio Stuff at http://www.ettflorida.com/, a full service provider of indoor and outdoor patio furniture. Visit the site for a wonderful selection of tables here, http://www.ettflorida.com/commercial-tables.html.
Tips for Growing Fruit Trees
 Almost everyone can grow one variety or another of fruit trees in their backyard. Here are some tips on growing fruit trees:
Plant fruit trees about 20 feet apart and in a sunny location.
Plant more than one variety of a fruit. That means there will be fruit more of the time and not all will mature at the same time.
Planting more varieties also means better cross-pollination of pears, apples, plums and cherries, which yields a more consistent production.
Use less common planting techniques. Plant two, three or four trees in one hole, or use espalier and hedgerows.
Small trees are much easier to spray, thin, prune, and harvest than large trees too.
Keep fruit trees at a manageable size. Choose a height that you can reach for thinning and harvesting while standing on the ground or a small, safe ladder. The only way to do that is by pruning.
Pruning is necessary to stimulate new fruiting wood, to remove broken and diseased wood, and to remove branches to allow good air circulation and sunlight penetration. The shape and size of a fruit tree is established during the first three years so pruning is most important during that time.
Prune fruit trees any time during January to March before flowering begins.
Be sure fruit trees receive adequate water during the growing season.
Keep a 3-inch thick layer of mulch around each tree to cover the soil over the root system.
Scatter fertilizer starting one foot away from the trunk and out far enough so that the outer edge is just outside the outer edge of the branches known as the dripline. Lightly scratch the fertilizer into the soil with a rake and then water well.
Fertilize just before bloom or leaf sprout occurs, usually in March. Use one pound of fertilizer for each one inch of trunk diameter.
During the trees second year pinch off any flowers and allow the tree to put all it's energy into developing its root system.
For more information on growing healthy fruit trees visit: http://www.apluswriting.net/garden/fruittree.htm
Copyright: 2006 Marilyn Pokorney
You may retrieve this article by:
Autoresponder: fruittree@getresponse.com
Website: http://www.apluswriting.net/articles/fruittree.txt
REQUIREMENTS FOR REPRINT: You have permission to publish this article free of charge in your e-zine, newsletter, ebook, print publication or on your website ONLY if it remains unchanged and you include the copyright and author information (Resource Box) at the end. You may not use this article in any unsolicited commercial email (spam).
Please leave the resource box intact with an active link, and send a courtesy copy of the publication in which the article appears to author.
About The Author
Marilyn Pokorney
Freelance writer of science, nature, animals and the environment.
Also loves crafts, gardening, and reading.
Website: http://www.apluswriting.net
Email: Current address on website
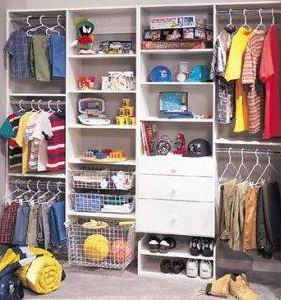
How To Use Color And Creativity To Store Kid Stuff
 Are you overwhelmed by clothes, books and toys everywhere? If you answered yes, just imagine how your child feels. With so much kid stuff everywhere room cleaning is anything but fun.
That’s where a little color and creativity comes in. Conquering clutter doesn’t have to be a chore. With a solid plan and a little patience you can turn a messy child’s room into an organized environment in a matter of hours.
By using color as an essential part of your child’s organizing system you make the clean up process fun. And by knowing that each toy has a home your child can then learn how to return items after play. Even very young children can benefit from color coordination.
Preschoolers in particular learn their colors faster when they routinely put colored items in matching bins.
A colored storage system starts by purchasing large cubes, bins or baskets. You don’t have to stick with primary colors either. The toys and storage containers of today come in all colors and shapes.
And if you’re having trouble coming up with enough containers in the color(s) of your choice consider spray painting baskets or covering boxes with matching wallpaper.
For more creative storage tips for children’s room visit http://www.decorating-kids-rooms.net/kid-room-storage.html
Unfinished wood furniture is ideal for rooms you’ll be implementing a colorful organizing system in. This kind of furniture is the ideal canvas for all kinds of decorative touches. You may even wish to give each drawer a different color.
Even when space is tight you can incorporate a little extra color and storage space by fitting the insides of wardrobe drawers with either hooks or plastic coated grids with shelves.
Organizing kid stuff by size is also a good idea. Storing small and large things together can result in lost or broken items. Where possible small items should be contained in smaller bins. That said, there is wisdom in storing items together that will be used together. In that case it’s a matter of packaging small items up separately within a bigger bin or container.
Colorful storage doesn’t end with visual storage around the room. Consider adding a little color to your child’s closet by using colorful hangers and hooks. More closet design and closet organization tips can be found by visiting http://www.decorating-kids-rooms.net/closet-design.html
There is no end to how you can use color and creativity to store kid stuff. As long as you can imagine it, you can make it happen.
About The Author
Sherrie Le Masurier is an organizing consultant who helps parents organize and decorate their children's rooms. She is a member of Professional Organizers in Canada (POC) and co-owner of http://www.decorating-kids-rooms.net - Copyright.
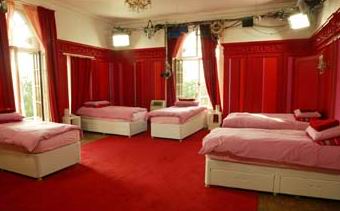
The Effect Of Light On Color
 Licensed interior designers and color consultants consider the direction a room faces. Whether it is north, south, east, or west, makes a great deal of difference to the choice of color scheme. For instance, a bedroom that faces east and receives strong sunlight in the early morning will look very different when next seen late at night in artificial lighting. A west-facing room that has a warm glow in the evening can look dull in the mornings. Your choice of colors should take this into account.
Of course, an ideal aspect is not always possible for everyone. City flats may enjoy little naturally available light and be overlooked on all sides. A north-facing room can expect less sun than a south or west facing one; but whatever the aspect, with clever lighting and color scheming the interior can be made to feel welcoming and attractive. The style of house you live in can also make a great deal of difference to the amount of available light in an interior. A country cottage may be in a superbly sunny location but have low ceiling and tiny windows, which can make the interior, feel dark and gloomy.
Modern homes with spacious open-plan interior and large picture windows will be even more affected by their characteristic and seasonal changes. If there is a living room with a patio or conservatory attached which is used as an additional seating area during the summer but not in winter, the decor will have to be flexible enough to accommodate the changes. For people in doubt over lighting and color schemes some top interior designers suggest painting a room white before making a final color choice.
This is a good way to observe how changes in natural light affect an interior and helps you make the most of it when choosing a color scheme. Window and walls will appear darker as they only receive reflected light; ceiling always looks darker than walls painted the same color. The effect of artificial lighting on curtains is better seen if a sample gauge of fabric is pleated and held upright. Put samples flat on the floor and move them around the room to see how different positions and lighting conditions can affect the color.
About The Author
Roger King has been involved in home interior painting for several years, and has been helping people find and review the best value for interior painting solutions. Visit his Web site http://www.decorativeinteriorpainting.com to learn more about this service.
What Is An Air Hammer?
 An air hammer is a type of hammer that is powered by compressed air. This type of tool is very convenient for many household projects. Any project including repairs, home improvements, and new construction can use an air hammer as opposed to a traditional hammer.
Air hammers require no swinging so they do not make the user tire as easily. This is especially useful for large projects that require a lot of nailing such as installing drywall. The convenience of pressing the hammer to the surface in order to deliver the nail home is much easier than traditional hammering. Air hammers will help prevent arm cramps and allow you to work longer without tiring.
Air hammers are also safer than traditional hammers. Because it is not necessary to hold the nail in place with your hand, this reduces the risk of hitting your finger. With traditional hammers, there is always the possibility of bruising or even breaking a finger if you miss the nail head. With an air hammer this risk is greatly minimized, making it a much safer option.
Using an air hammer will allow your project to be completed faster. Manually hammering nails is tiring work that can take a lot of time depending on the strength of the person using the hammer. With an air hammer though, this process is sped up considerably. You can increase the number of nails hammered and decrease the amount of time needed to complete the project.
Air hammers can be found in home improvement stores or hardware stores. They are also readily available online for convenient shopping in the comfort of your own home. There are many different brands available with various features. Decide the types of projects you will work on and how frequently the air hammer will be used to determine the brand and features needed. Do some comparison shopping to find the best price.
An air hammer is a great tool to have around the house. It is safe to use and will help reduce risk of injury. Air hammers are convenient and will allow you to complete a project faster than with a traditional type of hammer. Not only will you be able to finish a job faster, but you won’t be as tired. Because traditional hammers require a lot of manual labor, you are more prone to tire. An air hammer is a great investment for your home.
About The Author
Gray Rollins is a featured writer for BigBadHammer. To learn more about the types of hammers, visit us at http://www.bigbadhammer.com/ and http://www.bigbadhammer.com/jackhammer/.
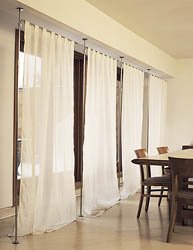
Dressing Up Shower Curtain Rods
 If you are on a tight decorating budget, or just like getting really creative, then you may want to consider using shower curtain rods in more places than the bathroom. Sure these rods are functional. They do hold up the all important shower curtain liner that keeps water in the shower and off the bathroom floor. But shower curtain rods also make great decorative poles in other room of the house.
Some of the Most Unusual Place to Hang a Rod
Shower curtain rods can be purchased for just a few dollars but look like a million bucks when used in some creative places around the house. It’s the kind of home improvement project a struggling college student can use or the most sophisticated decorator and still have a great new look.
In the bedroom: Drapery fabric or curtains are a great way to hide an unattractive wall or cover closets where doors just don’t work. The pressure style rods simply twist to the right size and are held in place by pressure. One consideration with this type of rod is that it cannot usually support very heavy drapes. If you are using velvet for example, you would probably need a rod that is mounted with good drywall screws.
Another creative place to use shower curtain rods in the bedroom is by suspending a couple from the ceiling above the bed. Sheer fabric can drape across both rods with a dip in the centre and then the fabric can cascade down the wall at the head of the bed. Not only have you created a romantic canopy, but you will also have a soft fabric headboard as a backdrop to decorative pillows.
In the Kitchen: A pantry area can be curtained off by using a shower curtain rod and some lightweight kitchen print fabric. This can be coordinated with café curtains on the windows and all of the table linens.
In the Sunroom: What to do with a sunroom that gets too hot? Most sunrooms are vented to control temperature, but it can still heat up the connecting rooms in the house when too much sun comes in. You can use a pressure shower curtain rod at either end of the overhead windows in a sunroom. Then stitch a pocket ½” wider than the pole’s diameter into which the poles slip. When you hang the rods the fabric can be taut or drape slightly. Either way you have diffused the sunlight just enough to control the room’s temperature.
Shower Curtain Rods for the Bathroom
The latest decorating trends have taken the mundane out of bathrooms. There are s-shaped rods that make an old fashioned claw foot tub able to support a shower spray. Also, there are new designs in rods that suspend them from chains so that they appear to float from the ceiling. You can dress up shower curtain rods by choosing fun coordinating colours or attaching the curtains with interesting ribbons or clips. It doesn’t have to be just a plastic ring through a button hole.
The ideas are endless and only limited by imagination and creativity. Spend some time looking through decorating catalogues and you will see that whenever there is an expensive rod used to hold up fabric, a shower curtain rod may do the job just as well, but for a whole lot less money.
About The Author
Peter Wilson revealed a lot of articles for http://www.curtains-drapes-coverings.com, a source on tips and tricks. The writer is writing on subjects such as shower curtain rods ( http://www.curtains-drapes-coverings.com/shower-curtain-rods.html ).
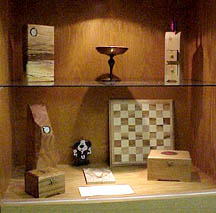
Do-It-Yourself Woodwork Projects
 Creating your own woodwork projects is an enjoyable past time that takes some skill, patience and creativity. If you are new to woodworking, rest assured that with each completed project, your skill level increases. The key to improvement lies in choosing appropriate jobs that match your skill level. Even if you consider yourself a beginner, many fun and creative woodwork projects can be tackled.
Personalized Woodwork Projects
Perhaps the most satisfying thing about woodworking is being able to give a unique and personalized gift to someone you love. Whether for a birthday, anniversary or birth, a handmade gift is memorable. Personalized woodwork is also a great present idea for children who seem to have everything. Creating a piece for a child does not have to be a difficult task and there are many toys and accessories that will appeal to a child’s tastes. For instance, building a rocking horse or rocking cow is a surprisingly simple project that all children would surely enjoy. There are really only three parts to the construction, the rockers, the handles and the footrests. To ensure that your rocking horse is safe and comfortable, the handles should be high-mounted and the footrests equipped with a cross-brace.
A popular woodwork project that appeals to girls is the Victorian dollhouse. Almost every little girl dreams of having her own beautiful dollhouse that she can play with for countless hours. This is a simple woodwork project that allows you to be as creative as you like. You may find yourself getting carried away with all the little details and intricacies of this project. It is up to you to decide whether you want to create a lovely and simple dollhouse, or one that is detailed and elaborate; either way, this project is great fun to tackle.
A hope chest is a gift given to a child, and over time, it becomes an heirloom to be passed on. Hope chests are wonderful, meaningful gifts that are also very attractive decorative pieces. This woodwork project is easily handled because it can be modified to your individual skill level.
Backyard Projects
Perhaps you would like to try a woodwork project that your family can enjoy. Woodwork projects for the garden can be easy and will make your backyard area more attractive and comfortable. If you consider yourself a beginner, building a trellis is easy and simple. However, trellises can also be made to look more elaborate with the inclusion of detailed lattice work. And, you can complement your trellis with an easy-to-build planter. Constructing a privacy screen is also a nice addition. This project only requires that you build a standard wooden frame, then, it is up to you to incorporate the personalized details. Building a picnic table is not really any more difficult, but it does require more time. So, if you are looking to undertake a simple project and you have no time restrictions, a picnic table is a wonderful backyard furniture item.
Woodwork projects are not only fun, but they can also become an interesting hobby that allows you to build personalized pieces. Whether your goal is to pass on your woodwork as gifts to others, or whether you choose to personally enjoy the fruits of your labour, there is certainly a woodwork project to fulfill your wishes.
About The Author
John Mann is an experienced home renovator and webmaster. Visit his website Workbench Ideas http://www.workbench-ideas.com/ for workshop tips.