6 Things to Know When Buying Cabinets
 1. Cabinet Styles
You can choose from three styles of cabinets. The traditional style reveals the frame with smaller doors. Full overlay doors, similar to European style, cover nearly the full frame. European style cabinets also have full doors but have a frameless construction. Inset doors close flush with the frame.
2. Wood species
Today cabinet makers offer plenty of choices regarding the wood used in your cabinets. Couple the wood choice with the number of stains and finishes, and the combinations are almost mind-boggling.
Oak - A long-time favorite that has recently slipped in popularity. This wood offers a large and prominent grain that makes Oak so distinctive. Medium hued stains are typically used.
Cherry - Very popular recently although more expensive than most other species. It has small even grain. If you see a section of very light wood, replace the piece as this is the sap wood. Cherry can be stained naturally (clear), but traditionally it has been stained dark with deep red tones to play up the natural red color of the wood. Cherry is also unique as it will darken as it ages.
Maple - With an even grain, Maple is known for its light color, one of the lightest of all wood species. As a result, most people use Maple with a natural stain or a very light stain.
Birch - Given its light color and even grain, many people mistake Birch for Maple. It too is usually stained natural or light.
Ash - Often used for painted trim due to its color variations, people are now using Ash to turn its varied color into interesting cabinets with natural to medium stains.
Painted - More expensive and custom painted cabinets will use a high quality hard enamel paint. Mass produced and even semi-custom cabinets frequently use a thermofoil laminate over the wood substrate, especially for white and almond cabinets. This finish can range from very high gloss to a very small "pebbly" look. With custom painted cabinets, you can also have two color tones or rub offs where a second color shows through (almost like highlights) in areas that have literally had the top coat of paint rubbed off.
3. Doors
Cabinet doors should always be solid wood for the best quality. (Thermofoil painted doors can be applied to a particle board or MDF - synthetic wood - substrates.) Styles abound with different profiles, accents, plain, and fluted. Cathedral style doors (with an arch at the top) are usually only used on upper cabinets. When you are looking at cabinets, make sure that no gaps exist between the joints or mitered (45 degree angle) cuts. Check that the doors are plumb (lay flat) and square (90 degree angled corners). Also look for any cracks in the wood. Any defects like these should be sent back and replaced.
4. Drawers
Many lesser quality cabinets can look great once they are hung as most doors are usually pretty good and solid. But open the drawer to get a true idea of the cabinet's quality and craftsmanship. The best cabinet drawers have dove-tail joints. These are like teeth that fit together and give added strength to the corners. They also should be glued and even nailed with wire brads (small nails with practically no head). Cheaper cabinets will just put two perpendicular pieces together and nail them. Over a few years, the opening and shutting (or banging, if you have kids) of the drawers will loosen the nails, and the joint will begin to open, and the drawer begin to fail.
In addition, the best cabinets use metal drawer guides. These can be on the sides or bottom of the drawer. Metal withstands greater pressure and bear to break or bend unlike plastic will becomes brittle with age and wear.
With custom cabinets, you can also choose drawers that slide all the way out unlike standard drawers which stop about 3/4 to 7/8 of the way.
5. Frames
Very few makers use solid wood frames. Why? It's extra money for parts that aren't seen. Particle board, MDF, or plywood is typically used in all except the front frame which should be solid wood to match your door. Sometimes the front of the frame will be veneer (a thin slice of finish wood laminated to a plywood substrate). If an end is butting up to another cabinet, it is frequently left unfinished - like the back - except for "out of the box" units (literally finished cabinets you buy in a box). Exposed sides are usually finished with a veneer. However, I have also seen cabinet sides finished with a wood-look vinyl laminate on really cheap cabinets. For a truly finished look in custom or semi-custom cabinets, order a wood panel like a door front that will be added to an exposed side.
6. Refrigerator or dishwasher panels
With custom cabinets, you can also order fronts for your appliances. Be sure to check that your make and model allows for cabinetry and provide the model and specifications to your cabinet maker.
Choosing cabinets involves many decisions. It helps to be prepared and knowledgeable before you start the purchasing process. However, your cabinets are truly one of the most important elements of your kitchen design and look so take care to make the best decision.
About The Author
Julie Lohmeier is the veteran of numerous home remodeling and building projects. From working hands on and doing much of the work herself to hiring contractors and construction managers, she has seen the entire spectrum of home improvement. She shares her remodeling tips, home decorating ideas, and other various rants at http://www.myhomeredux.com. Sign up for her free email newsletter at: http://myhomeredux.typepad.com/blog/2005/09/get_my_home_red_2.html.
Copyright © 2006, Julie Lohmeier, http://www.myhomeredux.com.
Broken Key Removal (Pin Tumbler Locks)
 Having a key break off in one of your locks can be a real pain in the neck. But with the proper information you can better understand the problem and take steps to solve it. With the information I provide in this article, you stand a very good chance of removing the key yourself and preventing it from happening to you in the future.
WHAT CAUSES KEYS TO BREAK
Most keys, even brass and nickle-plated keys, will eventually wear out and break along any of a key's cuts. But some conditions will speed up the process such as:
1. The key has one or more deep cuts which become the "weak point" of the key. After so much use (or just a little abuse) the key will break at these points. Having a deep cut as the first cut (next to the head of the key) can be real trouble but a deep cut in the middle of the key can cause big problems too;
2. The key is made of a light-weight material not suitable for everyday use. Keys cut on aluminum blanks are a prime example. They will also break at a deep-cut "weak point" only sooner. Identified by their light weight and either grey in color or sometimes bright colors such as red, green, blue or gold.
Usually before a key breaks, one or more tiny cracks will appear by the cut about to give way. You may want to check your keys right now -at least the ones that you use and depend on every day. If you see a tiny crack being formed by one of the cuts or if the key is bent or misshapen in any way, go to your nearest locksmith or key shop and get another one or two made. And just to be safe, don't carelessly toss the old key away. A new key could be made from the pieces and used to access your property.
BROKEN KEY REMOVAL TOOLS
We locksmiths have a variety of tools for removing broken keys from locks. One of the more common tools I use is made of springy steel that is 5" long, 5/16" wide at the handle and .022" thick. There is a small tapered barb at the end of this tool that will dig or "bite" into the broken key piece so the piece can be pulled out.
It is not absolutely necessary to invest in a broken key extractor tool. As long as the tool you use is made of sturdy metal, is narrow enough to enter the keyway, and has a barb to grab on to the broken key you will likely be successful. A scroll saw or jig saw blade should do the trick.
PROCEDURE #1 - Partial Key Broken Off In Lock
When a deep cut gets too weak somewhere in the middle of a key, you end up with the front part of the key in the lock and the remainder in your hand. The good news is the lock is probably in the proper position for key removal (more on that later).
FIRST - unless the lock has been in good working order (with the key going in and out smoothly) prior to the key breaking off, I suggest spraying a lubricant such as WD-40 or Tri-Flow in the lock's keyway first. You want the broken key piece to slip out as easy as possible and a dry or gummy lock will make the job harder.
SECOND - insert the removal tool into the lock's keyway so that the barb (or teeth) can contact the cuts of the key piece to be removed. You should be able to tell how far to insert the tool based on how much of the key you still have in your hand.
THIRD - let the barb "bite" into one of the cuts of the broken key piece and give the tool a sharp tug towards you. The key piece should coming flying out.
FOURTH - take the two pieces of the key to your local locksmith or key center and get another one or two made.
PROCEDURE #2 - All But Key's Head Broken Off In Lock
When the first cut in the key is deep and gets too weak, you end up with just the head of the key in your hand. Most of the time what remains in the lock is the operating part of the key. That is, all key cuts that are necessary to operate the lock are stuck in the lock (if you are really lucky, enough of the key will be sticking out so a small pliers/tweezers are all you need to remove the broken piece-but that usually doesn't happen). You can test if the lock will operate by taking a small screwdriver and, using it like a key, try turning the lock cylinder. If the lock cylinder does not turn follow procedure #1. If you can turn the cylinder more than a few degrees to the right or left you have to make sure the lock cylinder is positioned so the key can be removed. Let me explain...
Most locks have one position that a lock cylinder must be in for key removal. If you were to insert a key in most any pin tumbler lock and turn it, the key could not be removed until the lock cylinder is back in the proper key removal position. The same is true when removing a broken key piece that still works the lock. The key cylinder must be in its normal key removal position or you will be wasting your time trying to remove the broken piece.
FIRST - as in Procedure #1, we suggest spraying a lubricant such as WD-40 or Tri-Flow in the lock's keyway first.
SECOND - insert the removal tool into the lock's keyway so that the barb (or teeth) can contact the cuts of the key piece to be removed. You should not have to insert the tool very far - just so it reaches the first or second cut of the key piece.
THIRD - let the barb "bite" into one of the cuts of the broken key piece and give the tool a sharp tug towards you. The key piece should coming flying out of the keyway.
FOURTH - take the two pieces of the key to your local locksmith or key center and get another one or two made.
Now that you have read through this information, you should be ready to attempt removing a broken key on your own. Good Luck! NOTE: This article (with pictures) can also be found on my web site www.GoldKeySelect.com.
About The Author
Roger J. Fischer is a security professional with over 25 years of experience in providing security solutions for his customers. For more articles related to security, safety and a variety of other topics visit http://www.GoldKeySelect.com
Lawn Furniture
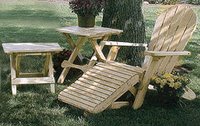 If you love being outdoors, you should pick lawn furniture that you love! It should be more than practical and functional. It should add to the very experience of being outside. There are so many options in lawn furniture, and you are sure to find something to fit within your budget.
Does your family host a lot of picnics? If so, there’s no doubt a picnic table in your future. Picnic tables come in a lot of varieties ranging from plastic to cast iron. This is one piece of furniture that can truly fit into any budget. If the picnic table will be used predominantly by adults, a cheaper plastic variety might suit your needs. But if kids are planned guests, think about investing in something just a little more sturdy that can hold up to a flurry of activity that usually follows kids.
If a picnic table and benches are not your style, don’t despair. Look into other tables. Choose a heavy glass and concrete pedestal table. Mix and match chairs to get the lawn furniture look you want. Or buy a set. Your lawn furniture fashion options are endless!
You can find lawn furniture at a number of stores ranging from your local discount or “big box” store to the woodworker who custom designs lawn furniture specifically to your liking. And don’t forget the Internet as a source. You have a world of lawn furniture at your fingertips and can even shop from home while wearing your pajamas!
No matter where you plan to buy your lawn furniture, there are a number of items you should check before making a purchase. First, if there happens to be a model on display, try it out. Sit in the chairs. Put pressure on the table top to see how sturdy it is. Does it tip easily? There is only one way to find out! If you buy a lawn furniture set that needs to be assembled, do an inventory of the contents of the box as soon as you open it. If you find that you are missing a part, call the store immediately and let them know you will be coming for either a replacement for the missing part or returning the set you have for a complete one. Once you get the complete set, follow the manufacturer’s directions for assembly.
Speaking of assembly, if the thought frightens you, ask the sales clerk if the store offers an assembly service. You can expect to pay extra for the service, but if saving time means something to you, the assembly service is worth considering.
Once you have constructed your lawn furniture, you are ready to start enjoying it. Maybe you already have the perfect place in mind for it. If not, just pretend your yard is a big room. Move your lawn furniture around to experiment with placement just like you would in your house. Once you find the spot, settle in. You’ll be happy with your lawn furniture purchase for a long time.
About The Author
Bob Benson is the founder of Furniture online. You can check out our website at http://www.my-wood-furniture.info.
contact@loan-source.co.uk
Furniture to Dress Up Your Office
 Sitting in an office all day long can get monotonous. Break through the daily rut by dressing up your office with some cool office furniture. Unless you operate your own office, you may not have total control over your office furniture. Most employers, however, won’t mind if you bring in a piece or two of your own furniture to make the space more comfortable and personable.
If you are bored with your current office look, bring in a new piece of furniture.
Maybe your office could benefit with a piece of furniture as simple as a new bookcase. If it’s a simple bookcase, dress it up with some fun accessories. Or bring in a small dresser that can help hold files, personal belongings or simply serve as a top to display your favorite photos from home.
You don’t have to buy a new bookcase or dresser for your office. Take an old piece of furniture from your home or hit the yard sales over the weekend and update it to fit your office space.
If it’s truly funky furniture you’d like to add to your office, you can find it. If you don’t have a local retailer, take your search on line. You can find chairs that look like puckered lips, exotic faux-fur chaise lounges, chairs that look like high heel shoes and lots of other fun, funky furniture ideas. Basically, if you can think of it, you can probably find the furniture you’d like! Your search may take a little while and you might pay a pretty penny, but it will be worth it if you find the funky furniture that makes going to work fun!
Another fun piece of furniture you could add to your office is an ottoman. Wouldn’t it be nice to prop your feet up every now and then at work? Even if you don’t utilize it’s function, an ottoman could dress up a room. Pick an ottoman in your favorite color or fabric design. For an extra special touch, pick an ottoman with lots of fringe! Your office will feel a little more “home-y” with this one simple furniture accessory!
If you have room in your office, an arm chair would be a nice furniture addition. Or how about a recliner? If you have one left over from a home re-arrangement, taking the chair or recliner to the office would be like bringing a little bit of home to work. It would also help create a personal atmosphere in what might otherwise be a “stuffy” or cold environment.
No matter how long you have been in the same office, you can make the space feel new and exciting by adding just a simple piece of furniture. Keep the necessities that the company provides and mandates, but add a little piece of furniture that you like to express your individuality. You will warm up to your work environment and your office will be a warmer place because of the personal touch your furniture piece has added!
About The Author
Bob Benson is the founder of Furniture online. You can check out our website at http://www.my-discount-office-furniture.info.
contact@loan-source.co.uk
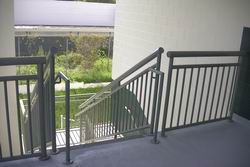
Differing Ways Of Use Of Aluminum Railings
 Aluminum is being used since a long time as a lightweight material for all construction and building works. Aluminum alloys are being used in every industry from Aviation industry to zip making. The strength to weight ratio is higher in case of aluminum to steel. The long life comes from the higher corrosion resistance of aluminum.
Differing Ways Of Use Of Aluminum Rails
Aluminum rails can be used in different ways. These ways that increase the life of aluminum are,
1. Anodizing of aluminum: The corrosion resistance of aluminum is further increased by a thin coating on aluminum. The anodized surface of aluminum prevents further oxidation of the corrosion of the aluminum.
2. Strengthen with wooden inserts: Wooden blocks inserted in the cavity of aluminum forms give added strength to aluminum and thus lighter sections can be used for the same work, further reducing the weight of structure.
3. Powder coating of aluminum: New painting techniques such as the powder coating add to the visual appeal of the railings. The overall effect of created by riot of color combination that are available is just amazing.
4. PVC coating: Aluminum can be coated after complete fabrication with PVC by various methods. This further increases the life of the aluminum products. It also gives a beauty treatment to the aluminum.
Ease of installation with Aluminum. Many manufacturers are coming up with solution in use of aluminum in railings. The use of the bottom posts in which the aluminum verticals can be fixe, speed up the erection process. The DIY enthusiasts find such solutions very useful since it reduces the time required doing for such work. These posts are made out of PVC, CPVC or such manmade materials.
Aluminum alloys also find increased use in the manufacture of railings and this gives an extended life to railings. The alloying with other metals increases further the already high strength to weight ratio and corrosion resistance.
About The Author
Adam Peters is a freelance author who contributes adding articles to a deck and porch railings website http://www.deck-porch-railings.com . At his site you can reach further articles on aluminum railing plans and designs.
A Guide To Window Hardware
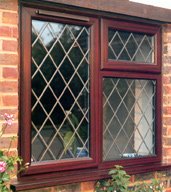 A variety of materials are available in window hardware. You have several options in terms of energy efficiency and design. Your personal preference, the climate and the style of your home will help you choose the right material for your house.
Types of Window Hardware
Wood
Wood has been the most common material used in window construction for generations. Wood is the easiest material to work with, either for a professional or a homeowner doing a DIY home improvement project. This material is most often used in custom work and intricately detailed designs. You have a wide range of options for painting and staining to fit every decorating need. This material is also very good in terms of energy efficiency.
The only downside of using wood is the maintenance needed. You will need to re paint or stain often. The peeling not only looks terrible, but will cause the wood to rot, if not maintained properly over the years. With good, regular maintenance, wood windows will last a long time.
Steel
Steel is most often found in older homes and basement windows. It is rarely used in newer homes because it is not very energy efficient. The heat from your home can easily escape through the frame of these windows. In addition, regular maintenance is needed. You must repaint steel regularly, or it will rust. Steel is a very durable material and is still used in hurricane storm shutters.
Aluminium
Aluminium is nearly as durable as steel. However, like steel, it is not very energy efficient and allows significant heat loss. This material does have one benefit over steel. It doesn’t require the frequent maintenance. The color of aluminium is baked on and a variety of colors are available. Repainting is not necessary.
Vinyl
Vinyl is an inexpensive and durable material for windows. In addition, vinyl is fairly energy efficient. In addition, vinyl windows are maintenance free. They don’t need to be painted. Vinyl is colored straight through, so you won’t ever see chips, scratches or peeling. A variety of colors are available to match your home’s decoration.
The biggest problem with vinyl is that it can look cheap. There are vinyl products that are made to look like wood, but the effect isn’t very good. They still have a plastic look.
Fibreglass
Fibreglass is a fairly new material for window construction. It is very durable and energy efficient. When insulated properly, it is one of the best in terms of energy efficiency. There is little heat loss with well insulated fibreglass windows. You will pay for this efficiency. These windows are among the most expensive.
Things to Consider When Choosing Window Hardware
Consider the climate where you live. If you live in a hot climate, you want to keep the heat out and the cold air in your home. Look for windows with a lower U value.
If you live in a colder climate, you want just the opposite: to keep the cold out and heat in. Heat loss is a major problem in cold climates and you’ll want to prevent this both through the frame and the glass. Choose energy efficient material and insulate it well. Consider insulated glass, which adds to the energy efficiency of the window. These products contain two layers of glass with argon gas in between the layers.
When replacing windows, consider the design of your home. You want the windows to match the architectural elements of your home. Make sure the material you choose fits in with the time period of your home. You won’t want wood, Colonial style windows on a modern Contemporary home.
About The Author
Charles Mahoney reveals many news to http://www.replacement-windows-tips.com an web site for information. The author is specializing in tips on window hardware ( http://www.replacement-windows-tips.com/window-hardware.html ).
Making A Gift Basket Is Fun And Easy
 Anyone can make a gift basket and you’ll definitely have fun doing it! Your basket, any container of your choice, should appeal to your recipient. The contents should also appeal to your recipient and should be customized for the occasion or the individual. So gather your ideas and head off to find those special gift items. Remember, your basket and the contents do not have to be expensive; rather you want the recipient to know that you took special care in making a unique gift.
Gift baskets are great for all occasions: for the new baby, a wedding, birthdays, get well, housewarming, special holidays or “just because I’m thinking of you”.
Be creative when selecting the “basket” and determine how much you will place in it to insure you select the right size. If your gift is for an adult, select a wicker basket, a gift box /bag, or a hobby/themed container. Themed basket ideas would include a range basket for a golfer, a tool box for a gardener or a handy person, or a specialty ceramic piece to capture your theme. If the gift is for a child, make it fun! Select a dump truck for a little boy; a girl would love colorful purse.
With basket in hand, you now need to fill it with what your recipient likes. Candies, nuts, cookies, cheese, crackers, coffees/ teas or a favorite bottle of soda or wine are snacks you must include! But remember to leave room for the personal gifts. Consider a book for the book lover, a DVD for the movie buff, mugs for the coffee aficionado, spa items for someone who likes to unwind or special hobby gifts for the chef or fisherman. Remember that you are creating a gift that is personal and unique, so select items carefully.
You now have the basket and the gift items, but you’re not creative and have not done this before, so how do I make the basket presentable? Fear not, it’s easy and fun. Place the largest item(s) in the back of the basket, heaviest in the center and arrange the remainder of the items in the front and sides of the basket. A little tissue in the bottom to assist in arranging, a little tape (very little) to keep the gifts in place, a bow or colorful cellophane and you’re finished.
Gift baskets are great for all occasions: for the new baby, a wedding, birthdays, get well, housewarming, special holidays or “just because I’m thinking of you”. The items to put it all together can be found in your home, at your favorite hobby shop, stores or on the internet. Make it special, make it personal and remember have fun doing it! When you present the gift to that someone special, they’ll appreciate it even more because you made it yourself.
About The Author
Larry Flynn owns Ardent Partners Inc. a professional internet marketing firm in Mesquite, NV. The company’s first website http://www.1greatgiftbasket.com offers a large selection of quality and affordable gift baskets for all occasions.
Say it With Roses!
 Many women and even several men know the value of sending flowers for special occasions. More than any other flower, roses are seen as the ultimate symbol of love and affection. But what many people don’t seem to know is the symbolism behind the roses themselves – they just buy what looks pretty. The colors, types, and display of roses have their own significant meanings, which should be taken into account when purchasing roses for that special someone.
If your relationship is strictly friendly, stick with pale-colored roses, as in general, they signify friendship. Pale pink and peach colors signify admiration, sweetness, and gratitude, which make these roses the perfect choices for floral gifts of friendship. Yellow roses, though a symbol of friendship, also signifies jealousy, so be careful when choosing yellow roses in a bouquet. However, to signify your happy feelings for your friend, a bouquet of red and yellow roses together is the ideal choice.
Romantic relationships in their early stages should be signified with white roses which symbolize innocent love. They say “I’m worthy of you,” and are just simply beautiful. Light and dark pink roses symbolize joy and thankfulness, and would make a beautiful way to say how happy you are to have that special someone in your life. If yours was a “love at first sight” encounter, choose lavender roses or thornless roses. Orange roses signify fascination, which also work lovely for blooming relationships, but if you’re not sure where you want the relationship to go, steer clear of putting yellow and orange roses in the same bouquet, as together, they represent passionate intentions. If you’re planning to confess your love, the fascinating moss rose symbolizes that intention.
While the rose, in and of itself, represents love, it is only the red rose that actually proclaims “I love you.” It represents true love and desire. A dozen red roses is considered to be the ultimate declaration of love. If you’re planning to propose, consider winding two red roses together, as this is a symbol of engagement. A rosebud with leaves, but no thorns (preferably in a red shade) tells your loved one that you no longer fear, you hope for things to come. If you want your engagement to be secret for a while, consider an offer of full-blooming rose over two rosebuds, which signifies secrecy. According to tradition, touching the flower to the lips implies a “yes” answer, while a “no” is given by pinching off a petal and casting it away. If your beloved is very fond of roses and wants to include them in her wedding bouquet, a bouquet of white and red roses together makes the perfect choice, as the colors, when joined, signify unity.
Just as roses symbolize a blossoming love, they can also signify the end of a relationship. As stated before, yellow roses signify jealousy, but they also symbolize a decreasing affection and even infidelity! A rosebud without thorns or leaves means “there is nothing more to hope or fear,” which in some ways can be both a blessing and a curse. A withered white rose represents despair, a withered red rose means “our love is over,” and the York and Lancaster damask rose, though quite pretty, symbolizes conflict. As one might expect, a black rose, which typically represents death, is also the ultimate symbol of “goodbye.”
Whether you believe in the traditional meaning of rose colors or not, you should always keep them in mind when giving or receiving flowers. Your special someone might believe in them strongly, or someone you know just might be trying to tell you something that they can’t quite put into words! Color talks, and you might be speaking louder than you realize!
About The Author
William Berg
Read more about the meaning of roses or about the meaning of flowers
robert@williambergs.com
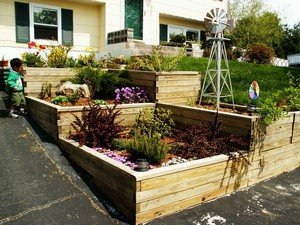
Terrace Gardening And Landscaping Ideas
 Terraces present wonderful possibilities in the garden. They are outdoor living rooms during good weather and form a transition from the outdoors to the indoors throughout the year.
The terrace may be either at ground level, below ground level, or raised above it. The simplest type is ground level, which requires only the grading we have indicated. There is a wide choice of flooring materials to use. One may use cement, poured and levelled with a large board, but in maintaining the drainage grade or including shallow drainage paths, smooth turf may be used, in which case the preparation will be the same as for other lawn areas and various other types of bases.
The use of flagstones is made simple by applying a load of sand or gravel to the subsoil and digging the flagstones into the sand or gravel. The niches between the stones can be dug out and filled with top-soil and grass or other cover planted between them. This gives a very pleasing effect.
Hollow clay building tiles can be split and laid as units in the terrace floor, their rough edges in the soil. Another good surfacing material is "exposed aggregate," which is free from glare because of its rough finish. For this type of surface, build a form of 2 x 4's. Pour the flooring in squares, one square at a time, and level with a straight board. The material used is a mixture of cement, sharp sand and crushed rock or pebbles.
Redwood or cypress blocks may also be used for terrace floors and are very attractive, although somewhat less durable than stone or brick. You can buy the blocks cut to size and lay them directly in a bed of sand, which in turn has been laid on compacted gravel or cinder. Un-mortared brick, laid in a pattern, on 2 to 4 inches of well-tamped sand, with loose sand in the crevices for grass, makes a hardy and simple-to-construct terrace floor. The bricks may be laid flat or on end, and to keep them from spreading, drive an angle iron against the corners. Use a pattern that follows the lines of your terrace.
The Sunken Terrace Gardening
A sunken terrace is one which is below ground level. It can be very attractive, and it does give a feeling of coolness on a humid day or a hot night. The sunken terrace requires a retaining wall to prevent soil from continually eroding into it, and also to maintain the topsoil of the surrounding garden. The subsoil must be dug to a depth of about 5 or 6 inches below the level you wish to attain with the terrace itself. The use of sand or gravel as a base is of importance. The top treatment can follow your own dictates.
The Raised Terrace Gardening
The raised terrace is generally not fully raised, but starts at the house level and is raised at its outer edge. Again, a retaining wall is called for. The principle problem with the raised terrace is levelling. Once this is accomplished, and the retaining wall built, construction follows the same procedure as in any other case. Drainage is supplied either by a central drain, going into a tile line, or by underground piping through the retaining wall.
About The Author
Alexander Sviridov
Landscaping and gardening hasn’t always been my occupation, but it has been my passion for a very long time. I inhale landscaping books and magazines. I have lots of landscaping ideas for all the enthusiasts at http://www.e-landscaping-ideas.com.
Ballroom Dancing Has Never Been Hotter
 Ballroom Dancing has never been hotter than it is now since Dancing with the Stars hit the air. Who knew that this show would be such a hit and that it would revive ballroom dancing the way that it has. Ballroom dancing is an enormously fun thing that you and your partner or a friend can do together. Ballroom dancing is a great way to spend some time together away from all of the normal everyday stress of life, that is what makes ballroom dancing such a fabulous thing to learn.
Ballroom dancing is something that everyone can enjoy whether they are young or old, man or woman. Not only is ballroom dancing fun it is great exercise and after a short while you will find that you will be in much better shape than before you started ballroom dancing.
Ballroom dancing is sexy and relaxed and one of the most popular forms of dance worldwide. Everyone loves to watch ballroom dancing and most people would jump at the chance to actually take some ballroom dancing classes. If you would like to take ballroom dancing all you need to do is look in your local Yellow Pages. There you will find plenty of dance studios that offer classes on ballroom dancing. There are other ways to find ballroom dancing classes and schools in your area. You will find ballroom dancing classes online as well. You will be able to do a quick search online and find many different studios in your area that will be able to teach you all about ballroom dancing. And even if you are single you will still be able to take ballroom dancing classes, as there are many ballroom dancing classes for single people. Who knows you might meet the man or woman of your dreams. Find out more information on Ballroom Dancing at www.goballroomdancing.com.
About The Author
Barbara Dallas
This article is courtesy of http://www.goballroomdancing.com. You may freely reprint this article on your website or in your newsletter provided this courtesy notice and the author name and URL remain intact.
Leather Jacket Care
 If you own a fine leather jacket then you've probably drawn a few looks here and there because of the style. Unfortunately over time, even a great leather jacket can turn ugly on you if it isn't properly maintained.
Prevention is Your Best Option
When you first bring your leather jacket home, you want to condition and waterproof it. After that, proper care will keep it looking fabulous for years. In fact, did you know that with proper care, leather out wears denim 20 to 1? I've heard stories where a good quality, well maintained leather jacket can last as long as 50 years!
Find out everything you can about your leather jacket, get the right stuff and set aside time for mandatory cleaning. If you don't do it yourself, then pay a pro to clean your leather jacket for you. You can thank me later for that tip!
Leather Jacket Repair
How can you repair the sleeves on your leather jacket when the edges are cracking, without making the leather weak or super soft?
If you have any loose edges, you can actually tack them up with a small dab of rubber cement which is sold at most grocery or retail stores. If the edges are not torn but just starting to look rough, one of the best options is for you to use a combination of mink oil and beeswax.
Typically this concoction is sold as paste, making it easy to apply. While it helps to improve those rough spots, it does soften but not too much. This combination will also help preserve the leather and prevent stains.
Leather Jacket Maintainence and Restoration
One of the top products you can buy for your leather jacket is called Lexol. This brand is excellent for restoring worn leather, bringing it back to its natural state. Another professional cleaner/conditioner is called Fiebing's All Purpose Leather Cleaner and Conditioner. It too helps restore leather that is worn while also helping to prevent water spots, stains, and even cracking.
Another great product that does it all, conditions, waterproofs, preserves, softens, and restores leather is called Snow-Proof. This product has no color or odor and is excellent on leather jackets as well as boots and shoes. Best of all, it will not leave a greasy feel.
Carnauba Cream will also help to restore and smooth out your leather jacket. It helps to resist scratches and finger prints and does a great job of restoration. One other product you should investigate is called Leather Balm with Atom Wax. This particular product was formulated specifically for leather to help with preserving and restoring. It also helps produce a nice soft, natural finish.
I suggest doing some research on these products before settling on one. Type the product name into a search engine and read up on their different properties. Prices and results will vary depending on the application.
About The Author
Jake Berlin
*** Hey! Want To Make Something Out Of Leather? ***
Discover How To Make Leather Crafts for Fun and Profit
Click Here ==> http://www.leathercraftsecrets.com
Antiques - The Modern Day Treasure Hunt
 In today's world, everything that’s old can be described as antiques and generally speaking that’s quite true. A product is considered to be an antique if it is over a hundred years old or is rare enough to have some value. In other words, these are old items that are in limited supply.
An antique is something collectible. It may be a piece of antique furniture that you want to collect to enhance the look of a room, or a piece of antique pottery to decorate a corner cupboard, or some antique books, antique camera and photographs, antique jewelry, antique money, antique car, antique clocks, or antique watches that you want to hand down to your grandchildren but the items must be rare enough to be considered an antique. The others are just secondhand goods junk. Most people have a common misconception about an antique: the older they look, the more antique they must be. Appearance has nothing to do with it, just because a piece looks like it came out of grandma's attic does not necessarily mean that it’s an antique. The value of an antique is based on demand due to suitability and limited supply.
Most people become fascinated in an antique for two reasons; either they have an interest in collecting antique purely for personal enjoyment and are willing to shell out money for antique restoration or they inherited it from a family member. The most common are antique pottery, antique car, antique furniture, antique books, antique camera and photographs, antique clocks, antique money, antique jewelry and antique watches. However they came about it, everyone wants to be sure of one thing that what they buy or inherit will escalate in value as time goes by. That is what antique collection is all about.
There are two main principles that apply when collecting an antique: The first is to know everything that you can about the antique that interests you and second is to obtain them at the lowest possible price. Doing so will not only give you satisfaction and enjoyment, but at the same time you will also be assured that your investment will appreciate in value.
Some people only developed an interest in antique because they inherited an item or a whole house full of antique from a relative. The dollar signs started to appear and they began their hunt for some antique appraisals and antique auction. But what most failed to consider is that much of what Great Grandmother had is probably just junk, unless she was a seasoned collector who’s into antique restoration or an expert in antique appraisals.
It’s true that people could have bought a piece of furniture to decorate their home a long time ago and that furniture, if it were of fine quality, would now be worth something. But only a professional appraiser can guarantee that, and appraising costs about $100-150 an hour. So if you are keen on bringing you item in an antique auction and contemplating about asking someone how much an item is worth, be prepared to shell out a few bucks for the information. Appraisers charge so much because they shoulder the lion’s share for insurance companies and lawyers settling estates. Although appraising is not an exact science, it still requires an appraiser to do lots of research and then prepare a detailed report that’s acceptable in a court of law.
About The Author
Jerry Goldfarb
Thinking about exploring the exciting world of antiques? Join us and utilize our resources in the treasure hunt for the exquisite. There is no membership required:
http://www.asianartantique.com
http://www.dynasty-antiques.com
6 Simple Steps to Becoming A HOT Guitar Player!
 Learning how to play guitar well is not easy. There are so many methods and so many conflicting opinions, it makes it difficult to know what to do.
But the simple fact is, if you want to be the best you can, as soon as you can, then all you need to do is - copy what the pro's do...
Master the Basics!
Mastering the basics means being able to play in all keys. Being able to transpose any song to any other key - on the spot preferably.
Did you know that 95% of guitarists DON'T master the basics. Oh yes, they mean to get around to it, but they hardly ever do.
Why is that? Well, it's because they think it's boring, complicated and too much hard work. And most of all - no fun! And mostly they were right. Well, it needn't be that way. Mastering the basics can be a lot of fun if you go about it in a methodical set-by-step way.
What does mastering the basics entail?
There are 6 basic steps you need to follow:
1. Learn the names of all notes on all strings, one string at a time.
2. Learn how to construct a C Major scale.
Basic must-know guitar theory. Easy stuff.
3. Learn how the chords of the major scale are made and what they are... their names etc. C Dm Em F G Am Bdim.
Basic chord construction knowledge.
4. Learn the triad patterns for the C major scale all over the fret board.
Triads are simple 3-note chords. Easy and fun to learn and play.
5. Learn to play those triads with common chord progressions.
Learn to play and apply the triads to the most common chord progressions that fit thousands and thousands of songs.
6. Learn to do step 5 in all keys.
Once you can do steps one to five in the key of C, it's real easy to learn it for the other 11 major keys.
Hint: It's much easier than you think. All the patterns are exactly the same as what you learn for C major. You don't have to learn any new patterns. Cookie cutter stuff.
It really is not hard at all. All you need is a methodical step-by-step method that makes sense and is easy and fun to use.
About The Author
John Bilderbeck is a professional guitar teacher and his step-by-step Master the Basics eBook course is free when you join his website. Claim your copy now - visit: http//www.free-guitar-chords.com
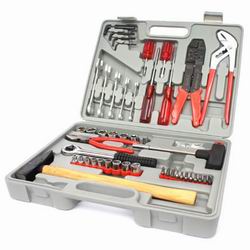
5 Automotive Tools Every Auto Owner Needs
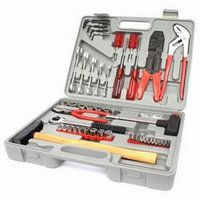 Automobiles are sizeable investments. As a car becomes older, its maintenance becomes increasingly important. There are many tools that every auto owner should have. Auto shops can sometimes charge exurbanite amounts for a simple fix that could have been done at home for much cheaper. Having the proper tools and knowledge will allow any auto owner to save money, learn more about their automobile, and maintain their car.
1. Every auto owner should have a jack and jack stands. When working on a car, more often than not, the car must be elevated. Simple procedures like rotating tires can be done at home with the help of a Jack. Additionally, all car owners should have a jack in their car with them wherever they go. In the unfortunate event of a flat tire, having a jack and a spare tire can lead to a simple tire replacement. In a garage, having a powerful jack and strong jack stands makes it possible for an auto owner to reach every point underneath the car and thus solve problems more efficiently.
2. One of the most important car maintenance practices is the oil change. To maintain an automobile, the oil should be changed once every 3,000 miles. Quintessential to a successful oil change is having an Oil Wrench that takes the oil filter off and allows the oil to be changed expediently. Without an oil wrench, an auto owner may be forced to take their car to an auto shop and overpay for a simple oil change.
3. Often when dealing with parts of the engine, or the hard-to-reach spots under the hood, proper tools are required. A 3/8-inch Socket Set can allow an automobile owner to loosen and subsequently tighten a wide variety of bolts. Different extensions allow the auto owner to obtain the best angles for torque and therefore make auto jobs quite a bit easier.
4. When changing oil, having a funnel, some rags, and a bucket is very helpful. Once again, the oil change is one of the most important maintenances for a car, and it can be done easily by anyone. However, many people do not have the proper tools or knowledge for a successful oil change. Having a funnel can also be useful when refilling any other fluids in one’s car. The funnel serves to make sure that fluids do not get over filled, which can lead to significant problems.
5. Finally, every auto owner should have a pair of solid vice grips. Some times a part will just not come loose. Other times, a car part may not seem to be tight enough despite one’s best efforts. Vice grips can hold a wide variety of car parts and allow the user to obtain more leverage for either tightening or loosening a part. When encountering a part that will simply not come loose, many auto owners will give up and take their car to a shop. Having vice grips can help one to avoid this problem.
Unfortunately, there is no car in existence that doesn’t require constant maintenance. However, with the right tools, anyone can fix minor problems and maintain his or her automobile without the assistance of an auto mechanic. The right tools can lead to a longer last vehicle, and large cost savings.
About The Author
Mike Scurria is very interested in automobiles. Learn more at http://www.sjdiscounttools.com.
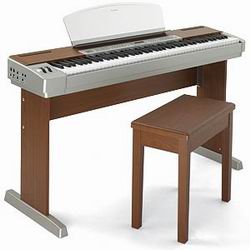
Tips On Buying Keyboards and Digital Pianos
 There are so many keyboards and digital pianos on the market today. How does one make a selection? Here are a few tips to help you choose one that meets your needs.
1. How much can you afford?
With such a wealth of keyboards available, a working person shouldn't have a problem finding one that fits their budget. Low priced keyboards are all over. But this doesn't mean that you should settle for anything. As the old adage goes, you usually get what you pay for. Usually the more money you invest, the greater the returns.
2. Do you need weighted action or synth action.
Weighted action means that the keyboard comes with heavy (weighted) keys and feels like an acoustic piano. You need some muscle to play such keyboards. If you're a trained pianist or you want to develop your piano skills a weighted keyboard would be better suited.
Synth action would mean lighter keys. You can usually play faster and easier with a synth action keyboard. Are you gonna be playing synthy and techno stuff? Then synth action is what you need.
3. How many keys do you need?
You have a choice between 88, 76, 61, 49, 37, 25 keys, and even less. Your choice should be based on your needs and circumstances. For instance, players doing stuff that requires a small range, like samples, only need a few keys. 76 keys are usually best for quality synth action. But if you're into stuff like sound development you can't afford to work with anything short of 88 keys.
4. Do you need an onboard sequencer?
You need to avoid duplication. If you're already sequencing on your computer you don't want to pay for a keyboard that comes with a sequencer. You may never use it. An onboard sequencer is more important when you're working without a computer.
5. Consider whether you need a workstation.
Workstations perform so many functions. These include everything from sequencing, to sampling, to effects, and mixing. Again you should avoid duplication. If you're already doing all that on your computer, you probably don't need to pay extra for a workstation. Don't buy features that you already have. But a workstation is an incredible and necessary tool when a computer is not in the mix.
6. Importance of velocity and aftertouch features.
Ensure that your keyboard comes with velocity and aftertouch features. Velocity refers to how the sound responds to the amount of pressure applied to the keys (how quickly keys are pushed down). While aftertouch deals with the control data that is generated by pressing down the keys after they have reached and are resting on the keybed.
7. Will you be gigging or not.
If you'll be carrying your keyboard from gig to gig, durability should be an important consideration. What material is used? A hard case should come in handy for protection. The weight of your keyboard is also part of the picture; unless you don't mind the hassles of carrying a heavy keyboard or digital piano from one gig to another.
You should be able to find a keyboard easily online. You can order one that suits your needs today. Some of the best music keyboard and digital piano prices can be found on the Internet. You even get free shipping to your door.
About The Author
Mantius Cazaubon offers a guide to help you choose a musical keyboard that meets your needs on his site, http://www.yamaha-keyboard-guide.com. Visit http://www.yamaha-keyboard-guide.com for Yamaha and other music keyboard reviews.
Body Art
 There are several forms of body art. Body art can be temporary, for example, body painting, or permanent, such as shaping, dyeing, and scarification, tattooing, and piercing. This article will provide some insight into body art.
Body art painting and shaping
Body painting transforms a person into a spirit or work of art; this can include another gender or a sacred place. Emphasizing on the visual appeal of the subject, the protective body paint is what gives it the appeal.
Body shaping is a technique in which to sculpt the body. Culturally defined ideals of beauty have caused people to bind the soft bones of children's skulls and feet, stretched necks with rings, and removed ribs to make their waist smaller. The most common method today of body sculpting is plastic surgery. Plastic surgery can sculpt and define almost any part of the body.
Skin Dyeing
Henna, is used as a temporary skin dye, in which different patterns and designs are applied to the body. The crushed leaves of the henna plant, when mixed with other natural ingredients, provides a thick, aromatic paste used for painting hands and feet. The olive green, dried out henna powder, mixed with such ingredients as black tea and coffee turns dark. When applied to the skin and left on overnight, it will harden and when pealed leaves a red tone to the skin.
Body art piercing, tattooing, and scarification
Piercing is ornamental as it allows the body to hold certain kinds of ornaments, which are inserted through the skin. The most common parts of the body that are pierced is the face although you will often find ear, nose and lip ornaments. Piercing is often part of a ceremony marking the coming of age. Ornaments might be limited to certain people or worn only on certain occasions
Tattoos are intended to be permanent and the patterns and techniques have varied over the years. The effects of tattooing depend on the country you live in. As an example, in the United States, tattooing is typically looked upon as being rebellious. Tattooing, in the last decade, has become a very popular form of body art throughout the world.
Scarification is much like tattooing, instead of placing a color into the skin with a tattoo needle, the color, or substance is placed into the wound or cut. Once the wound has healed, a permanent mark will remain on the skin
All of the forms of body art listed above can have adverse effects on individuals. There are health concerns with types of body art. If you are contemplating any of the above procedures, be sure to consider all the risks and facts before making any commitments.
About The Author
David Chandler
For more information, visit http://www.BodyArtGuide.com