Hot Tub Safety for Children
 Thousands of children are injured every year in hot tub and spa related accidents. Some of these incidences have even resulted in the fatality of young children. Taking the necessary precautions before allowing children into the hot tub can significantly decrease the likeliness of hot tub related injuries. Most people will only allow children to sit on the side and put their toes in the hot tub to avoid injury. Under no circumstance should anyone, let alone a child, put their heads under water.
The following is a list of hazards to which children must be aware of before entering the hot tub:
1. Drowning – Drowning is the most common hot tub related injury for young children. Children under the age of five are especially vulnerable to this type of injury.
Safety Measures - Keep an eye on your children at all times. Never leave children in a hot tub unsupervised and always make sure there is a locked safety cover on your hot tub whenever it is not in use. This will prevent children from climbing on and possibly falling into the hot tub when they are alone. If you are going to allow children into the hot tub please ensure all children wear PFDs, while in it.
2. Trapped Body Parts – Another hazard associated with hot tubs is the possibility of body parts becoming entangled from the suction of the drains. The drains of hot tubs are very strong and have the power to suck in body parts making it very difficult to escape.
Safety Measures – Always make sure to have drain covers on every drain in your hot tub. Also, make sure these drain covers are in good working condition and are not cracked or broken in any way.
3. Hair Entanglement – Like body parts, there is also a risk of hair becoming entangled in the drains of your hot tub. This is especially risky to individuals who have hair past their shoulders.
Safety Measures – Always make sure hair is tied back in a bun or ponytail. Never submerge your head under water. Keeping your head above water at all times to ensure your hair does not become entangled. Knowing where the off switch is for your hot tub pumps will also ensure quick recovery in case such a situation arises.
4. Burns – Hot tub temperatures which are considerably high pose a threat to children. Not only can it burn the skin but water which is too hot can also cause heat stroke and fainting. Fainting in a hot tub can be very dangerous and can potentially cause fatality.
Safety Measures – Always keep the water temperature in your hot tub under 104 degrees Fahrenheit. The temperature of the water should be lowered when children are submerged since their skin is more sensitive and more likely to burn.
Warning your children of the dangers can help to prevent hot tub injuries. If a serious injury arises in the hot tub do not hesitate to call an ambulance, at 911, or other form of medical help in order to receive the assistance you require. Do not let your children become part of the statistics listed above.
About The Author
Terri Greene works as a contributing editor for the http://www.hottubsandhomespas.com website which offers information about hottubs - for everything from steam rooms to spa comfort accessories.
Motion Detector Technology
 Motion detectors are in use all around us in both residential and commercial locations. There are many common uses for motion detectors that most people find convenient and helpful in very common, everyday situations, and there will be some new and innovative uses that we may see more and more of in the future.
Residential Uses
Residential consumers are putting the motion detector to a variety of uses. They can greatly enhance the exterior lighting to any home and add to the security once inside.
If your concern is coming home to a dark house and tripping on the steps, motion detector controlled floodlights can create well-lit paths lighting up your yard, driveway, sidewalk and steps. This makes for a safe path to welcome both you and your guests. Floodlights should be mounted high up on the wall to keep the light out of your eyes and to illuminate a wider area for increased security. The same flood of light that walks you and your guests to your door safely will deter would-be-intruders. When the lights are triggered by motion this gives the impression that someone within the house is able to see and watch the burglar’s every movement.
Once inside, motion detectors placed in key areas can detect any violators and alert the proper authorities. Usually, one placed properly on the main floor and one on the lower level, if you have one, will serve as good traps. Stairways are often a good area to consider when placing the device, since you will be better able to prevent unauthorized passage from one floor to the next.
One innovative use in the home is to install an alarm or medical alert system that detects any health or safety issues with the elderly. Included is a motion detector that signals the central station operator can take control of the camera, assess the situation, and take action if needed.
As you have just learned, motion detectors have a wide variety of uses to suit many different needs of various users. Since motion detectors are so versatile and have so many uses, they provide feelings of safety and security for the average homeowner as well as a large commercial establishment. Motion detectors have evolved a great deal over the last few years to incorporate more features that are useful to more people, and the development and expansion of motion detector technology and functions will continue to expand and grow to provide more ways to keep your home and businesses safe. What will they think of next?
About The Author
Boyd Norwood is a specialist in online advertising with 10x Marketing. Motion Detector information is available at AlarmOneInc.com
Grandfather Clocks
 For many people, the dignified appearance and mellow sound of a grandfather clock gives life to a home; in addition, buying a grandfather clock can be an excellent investment.
As decorative objects, they cover a large variety of styles, from the early country examples to those with extremely sophisticated dials, movements, and cases.
When first built, these clocks were referred to as the long clock, tall-case clock, tall clock, hall clock, floor clock, or even coffin clock. The term "grandfather clock" became its most popular name after a song writer by the name of Henry Clay wrote a "Grandfather Clock" song in 1876.
A BIT OF HISTORY. . .
The very first early mechanical clocks, which didn't have pendulums, were developed in the last half of the 13th century, probably by monks from central Europe, and were placed within the church. They did not have dials or hand and only struck bells on the hour. It was over 100 years before visible dials and hands were added. These early clocks were very large and were made of heavy iron frames and gears forged by the local blacksmiths. By the first part of the 15th century, small domestic clocks started to appear. They were probably made by the local gunsmiths or locksmiths.
After 1630, before the swinging pendulum was invented, lantern clocks were used to keep time. These clocks were originally made to hang from a sturdy hook on the wall by means of an iron hoop at the back of the clock. Being weight-driven, lantern clocks would have one or two weights hung on ropes through holes in the bottom of the clock and were held in place either by spikes protruding from the bottom of the backplate or the back feet.
Another option was to place the clocks on an oak wall bracket. These clocks were not expected to be accurate timekeepers and only marked time in units of a quarter of an hour, registered by a single hand. This weight-driven clock became popular for the home use of the very wealthy. Then came the swinging pendulum in 1656 and a more accurate clock "was born."
The movements of this very early clock were mounted high above the floor because they required long pendulums and large cast-iron descending weights. This simple mechanical works with a face and hands was referred to as "wags on the wall." Wooden cases were originally used to hide the unsightly weights and cast-iron pendulums as well as to protect the weights and pulleys from dust and from interfering children or animals.
These clocks gradually changed to having shorter pendulums and verge escapements (sometimes referred to as crown-wheel) housed in narrow, ebony cases. By the 1670's, the verge escapement was discontinued in favor of the anchor escapement, a much simpler process which increased the accuracy of the clocks. Through the years, the grandfather clock became known as an excellent timekeeper.
THE GRANDFATHER CLOCK CASE
The grandfather clock case consists of the base, waist, and hood. Some original designs included feet, waist columns and door columns, hood fret work, and finials (the decorative parts at the top of the spire). In their heyday, many tall-case clocks were built over 9 feet tall. Today most range from 6 feet to 7 feet, 6 inches in height. Cases shorter than 6 feet are considered grandmother clocks.
Not only did the time piece become more efficient but the case used to house the mechanical parts of these grandfather clocks also evolved tremendously from these early wags-on-the-wall prototypes. At the beginning, most clockmakers were not skilled in wood techniques and turned to jointers for their woodworking abilities. These early jointers used the exact same jointing techniques and styles they used on furniture.
Cases were made of many kinds of woods. Although hardwoods such as maple, cherry, walnut, and mahogany were usually used, other lower-cost clocks were made of pine, which usually had a painted grain added to simulate the more desired and expensive hardwood. One might say that many cases were very elegant and beautiful while others were extremely crude. As the years passed, these cases became more and more ornate and sophisticated, especially during the Victorian age.
When tall clocks were popular, they were referred to as a "new clock"; the term referred to anything with a pendulum and a clock house, or case. In those days, most clock cases were made by local cabinetmakers while the works, either brass or wood, were made by a firm that specialized in clock works. The cabinetmaker engraved or painted his name on the dial, thereby taking claim for the completed clock.
After 1800, more and more people were buying grandfather clocks because they were made in quantity therefore more affordable. After 1840, wooden movements were abandoned, and the 30-hour brass movement became popular mainly because of its low price. Soon after, the spring-powered movement came into being and really paved the way for a variety of totally new and smaller clock cases.
Today, not only are the cases carefully crafted of fine wood, (many have added beautifully decorated finials), but they also have intricately designed pendulums, they chime the hour, and they need to be key wound only every 30 or 31 days.
Today's grandfather clocks are awesome!
About The Author
Marcelle Snyder
Born in New Brunswick in 1942, Marcelle Snyder started her teaching career at the age of 19. In 1976, she and her two daughters moved to Ontario where she continued her teaching career at Durham College. Recently retired, Marcelle picked up her second interest, decorating, and decided to sell her favourite clocks on the internet. Always interested in learning, she researched the origin and evolution of clocks, especially the grandfather clock and pewter clocks, and wrote articles summarizing some of her findings. You can read some of these articles at http://www.AwesomeClocks.com.
m.snyder@sympatico.ca
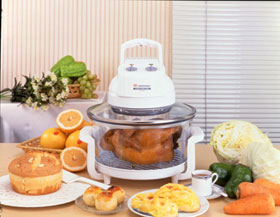
Cook Healthy Food In Minutes With Turbo Oven
 Turbo oven is an ultimate product that makes cooking healthier foods easier than ever before. Turbo oven not only reduces the need to cook with additional fats and oils, it also prepares delicious and healthy meals in minutes, retaining all the nutrients.
Each Turbo oven comes with upper and lower racks for cooking complete meal at once, break resistance detachable glass bowl, tongs, detachable power chord, and durable cool-touch handles and base.
Turbo oven can do a lot more than your expectation:
It can perfectly broil, bake, fry, roast, boil, grill and steam food.
It takes 25-30% less time than traditional ovens.
It uses 80% less energy than conventional oven.
It retains the valuable nutrients in the food.
It lets the unhealthy oil drips away from food while cooking.
It cooks food keeping them tender, juicier and rich in flavour.
Turbo Oven Cooks Food Evenly
When you cook food in Turbo oven the food is cooked from all around instead of only from the top and bottom. It thus minimizes the risk of scorching the surface of food, leaving the inside raw. The hot air moving all around the oven helps in ideal even cooking.
Turbo Oven Keeps The Food Nutritious
Researches have found that if food is cooked for a long time, its nutrients are lost. If food is boiled in liquid and then the liquid is drained out, then also the food loses its nutrients. Turbo oven can cook without boiling and can cook quickly to retain the nutrients. Turbo oven also eliminates the need to cook food with additional oil or fat. Be it deep-fried, pan-fried or sautéed - food comes out healthier.
Turbo Oven Saves Time And Energy
In addition to the health benefits, Turbo oven saves your time and energy by cooking food faster. You require very little preparation before inserting the food into Turbo oven for cooking. Turbo oven takes considerably less time for cooking than traditional oven. While a traditional oven takes around 2 hours to cook a whole chicken, Turbo oven can cook that within 45 minutes! With Turbo oven you can save your valuable time and utilize it in some other work. Since Turbo oven uses 80% less energy, it saves your energy cost too.
Turbo oven has all the qualities you wish to have in your oven to make nutritious meals. Turbo oven is convenient, easy to use and saves time and energy. So, you make healthy meals for your family and spend quality time with them as well.
About The Author
Allan Wilson
For more interesting articles about home improvement, home decor and generally anything that helps improve your home then please visit: http://www.pokingaroundthehome.com.
Are My Grapes Ready to Harvest?
 This is the time of the year that I keep hearing the question "When do I harvest my grapes?" Or sometimes the question is phrased "Are my grapes ripe yet?" And then there's the "Are they ready yet?"
Yes, it's that time of the year when grapes are turning color and homeowners are thinking about when their grapes will be harvested. But many homeowners think that when the color turns, the grapes are ready to eat. They pick a few colored berries and pop them in their mouths only to find that there is very little flavor and a puckering feeling hits their pallets.
Just because the color has turned on your grapes, it doesn't mean they're ripe. Generally speaking, grapes need one to three weeks after turning color to be considered ripe for harvest. But this time frame is dependent upon many factors including the variety, what the grapes are to be used for, and environmental conditions like the weather.
The grape variety has a lot to do with how quickly the grapes will ripen. Varieties are classified as early, mid-season, and late depending on how many days it takes for the grapes to go from full bloom of the flowers to harvest ripeness (Usually compared to the Concord variety). It should be obvious that early varieties will ripen fast and be picked much earlier than late varieties. If you grow a variety that is considered late in an area with a short growing season of less than 170 days, the grapes will never get totally ripe.
What you are going to use the grapes for goes hand-in-hand with the variety. Each variety has been bred for specific uses. Some are table grapes. These are used for eating. There are jam and juice grapes. And then there are wine grapes. Each are harvested by sugar content and acidity.
Table grapes don't need as much sugar as wine grapes to be considered ripe. They usually reach between 16 and 18 percent sugar before they are ready to harvest. For the homeowner with grapes in the backyard or garden this is hard to measure. But since you are going to eat them, you only need to taste the grapes to determine if they are ready. The flavor components are as important as the sugar level of the grapes. When they get to the point where you think they taste good, then pick them.
Be sure to taste more than one berry to determine this though. Not all grape berries are ripe at the same time. Berries in different parts of the cluster ripen at slightly different times. Clusters don't all ripen at the same time either. Clusters in the sunshine ripen quicker than those that are shaded. Clusters towards the base of the shoot ripen earlier than those towards the tip of the shoot.
Wine grapes need more sugar to produce a higher alcohol content when fermented. Grape growers like wine grapes to reach 20 - 24 percent sugar ideally. Here again, this is variety dependent. Acidity is also important when considering the ripeness of wine grapes. Too high acidity will make the wine taste acidic and bitter and too low will make the wine flat.
If you are growing grapes to make wine, you might want to invest in an instrument called a refractometer to measure the sugar content of your grapes. This tool makes it easy to find out how much sugar is in one or more berries. The juice of the berries is squeezed onto the refractometer plate, the plate is closed, and then by holding the instrument towards the light you can look into the eyepiece and see what the sugar reading is.
A less expensive means is to use a hygrometer. You need at least 50 berries to determine the sugar content by this method though. Hygrometers are more accurate than a refractometer and that's the trade-off. The hygrometer is floated in the grape juice obtained by squeezing the berries and the sugar content is read off the scale in the neck of the hygrometer.
Acidity can be measured by the titration method. But this is more in the realm of the chemist than the hobby grape grower. Because the pH of the juice is related to the acidity, it is more convenient for the small grower to use a portable "pH pen". A pH of between 3.00 and 3.55 generally indicates that the acidity of the grapes is in the for making wine. This also will depend on the variety.
The seeds of the grape berry are also an indication of ripeness. If the seeds are green or light tan, the grapes are usually not ripe. Ripe grapes have brown, mature seeds. Along with this, the ease with which the berries can be pulled off the cluster also can indicate degrees of ripeness. Ripe grape berries can be pulled from the cluster with little resistance.
Birds, raccoons, squirrels, and other wildlife that like to eat grapes can also be an indicator that your grapes are ripening and ready for harvest. These pests will harvest and eat your grapes as soon as they are ripe. Of course, you don't want to allow them to eat your grapes before you have a chance to harvest them. Bird netting and fences are needed to keep these pests at bay and allow only you to have the pleasure of your grape crop.
There are many fine books on growing grapes. If you want more information on how to grow grapes in your backyard or garden you can find my selection of suggested books at: http://www.ristcanyonvineyards.com/grape_growing_books.html
About The Author
Jim Bruce
More information on growing grapes (especially under marginal conditions where grapes are not usually found growing), can be found at Jim's website. Just visit: http://www.ristcanyonvineyards.com.
ristvin_jrb@yahoo.com
Organizing Your Living Room-Family Room
 Generally there is one room in the house where most of the "family living" takes place. In order to have a pleasant and welcoming living area for your family, and a place you can be proud of when you have visitors, you need to come up with some type of organization and storage for your main room, whether it be the living room or family room.
Step back and take a look at your room as a stranger would. Is it cluttered? Are there newspapers, catalogs and magazines pilled up all over the tables? Kids toys thrown all over? Shoes lying around? What is the condition of the furniture, would you feel comfortable sitting on your sofa, or does it obviously belong to the family dog?
One great way to start organizing any room in your house is to start with empty baskets with the name of each family member. Anything that you find in the living room/family room that doesn't belong in that room goes into that person's basket. That pair of sneakers, those comic books, that old sweatshirt, the toys. Deliver the basket to the appropriate owner. Once you've gone through the clutter, focus on newspapers, catalogs and magazines. Throw out the old ones. If you must have your magazines and catalogs get a nice magazine holder you can put next to your chair.
Now that you've cleared most of the clutter take a look around again. Just how dusty was that furniture under all that "stuff"? Get one of those nifty magnet-like dust cloths and dust, dust, dust. It's likely that once you see clean and shiny surface you'll be more apt to keep it that way. Use some Windex on your TV and stereo cabinet. Looking much better by now isn't it? Now it's time to vacuum. If you have the time, do it thoroughly. Have someone help you pull the sofa and chairs out, vacuum behind them. If you don't have the time, vacuum around the furniture until you do have the time for a thorough vacuum.
Now it's time to focus on the furniture. If your sofa has been stained and shredded by the kids and the animals, and if the site of it make you cringe, imagine how your guests feel when you invite them to sit on it. It might be time for a new one. If a new one is out of the question, you can easily give your sofa a new and updated look with a slipcover. There are lots of fitted slipcovers available in wide varieties of colors and patterns and there is sure to be one to suit your decorating taste.
There, wasn't that easy?
About The Author
Simon Harris
This article courtesy of http://www.vac-answers.com
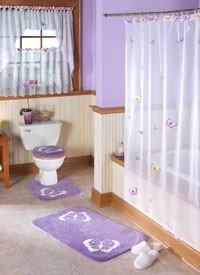
Shower Curtains Can Give Your Bathroom A Quick And Easy Makeover!
 Bathroom shower curtains offer an affordable way to instantly freshen up a dull looking bathroom. As well as looking nice, shower curtains have the practical function of preventing water spraying out of the tub and soaking the surrounding bathroom fixtures. Installing a curtain is very easy, using rings or hooks to suspend it from a rod. Spring loaded rods can be held in place between two walls without the need for drilling holes in your tiles. This is particularly good if your shower curtain is just a temporary solution until you fit a shower enclosure.
Shower curtains are made from several different sorts of washable fabrics, including cotton, polyester and plastic. Most are water resistant, but if not a waterproofed liner can easily be attached. Some come with weighted hems to help hold them in position. Although not as sturdy as glass shower enclosures, curtains can be very effective with electric showers, though the force of water spray from power showers may be too strong for a fabric curtain to prevent leaks. In that case you may want to look at folding or sliding shower doors to ensure your bathroom cabinets and vanity unit don’t get soaked.
Fitting a shower curtain can instantly change the appearance of your bathroom. Curtains for showers come a huge variety of designs and colors, from polka dots and stripes to plaid, Waverly toile or tropical Hawaiian prints. If you’ve got a specific theme to your decor, you should be able to find a design to fit in. Aquatic, nautical and beach themed curtains are very popular. For kids, colorful prints of dolphins, frogs and rubber ducks are a favorite. You could add a touch of elegance or a splash of fun to your shower times with your choice of curtain.
Bathtub and shower stall curtains are a cheap but effective way to smarten up your bathroom and give it a vibrant new look.
About The Author
Caroline Smith is a successful home furnishings writer who has written many articles for http://www.showers-bathrooms.com - The experts when it comes to choosing shower curtains, shower enclosures, bathroom vanities and other bathroom essentials.
How To Spot Weeds And Deal With Them
 When I was a child, I loved to pick Dandelions. The pretty yellow flowers were small, colorful, and looked nice tucked behind my ear! However, if one had popped up in the front yard, my hair accessory would have been considered an atrocity! I often feel sorry for weeds. They are plants too. In fact, if you flipped through a botany field guide, you may be surprised at the plants you find classified as weeds! But simply put, a weed is really defined as a plant out of place.
Clover in one persons flowing lawn may be considered fashionable, whereas on another, not. Golf greens are often covered with bentgrass, but if it crept up in some yards, it would be considered a weed. While perhaps pretty on their own, weeds stick out like a sore thumb in yards because they may be of a different color, size or texture. This is distracting from the beauty of the otherwise sprawling green turf. Aside from aesthetic values, weeds can also drain nutrients from grass and other plants, and this competition of resources can thin what should be lush. And what’s worse is that weeds are fighters. They can withstand conditions that your wanted greens cannot, so they are almost inevitable!
Treating weeds begins with correct identification. There are two classifications of weeds: Grassy and Broadleaf. These are further broken down into groups like perennial, biennial, and winter and summer annuals. These, as you may gave guessed, depict their growing patterns. Grassy weeds are, as they sound, like grass. However, they are unwanted grass, or grass that is growing in a different type of lawn. Some examples are annual bluegrass, barnyard grass, crabgrass, creeping bentgrass and foxtail. Broadleaf weeds may appear more to be what most people picture weed-like growth to be. Since they are broad, they are more easily distinguished. Some examples are yarrow, knotweed, chickweed, clover, ground ivy, thistle and my favorite, the dandelion.
Once you understand what is growing in your lawn and decide that it is unwanted, you can treat it and/or control it. Weeds can actually be controlled by your lawn care maintenance. If you maintain a dense and vigorously growing lawn, you are already combating the problem. Weeds can be a sign of underlying problems in the environment beneath. So by just killing them, you are simply putting on a band-aid, not solving the problem. For example, some weeds grow in situations of compacted soil, such as knotweed. You can also control the growth by taking better care of the grass, rather than focus on the weeds. You can raise or lower the mowing height, change the frequency of mowing and changing the amount of time between irrigating. Also, you can increase or decrease application of fertilizer and aerify the soil. This will maintain better grass, thus keeping the growth dense and vigorous, which as discussed above, does not attract weeds.
In addition to culture practices, sometimes the assistance of chemicals is needed to control weed growth. In that case, there are several types of herbicides that can be used. Pre-emergence herbicides will affect seeds that are germinating. Since they are best used two to three weeks before the seeds start to grow, these work best to combat annual weeds. Post-emergence herbicides are used, as their prefix implies, after the weeds have sprouted. Since they must be absorbed through the leaves, this types of herbicide works best with a spray. These can be used at any time, but are most effective when the weed is still young and growing. Selective post-emergence herbicides are usually used to control annual, biennial and perennial broadleaf weeds, as they will not damage grass. But, they can kill trees, shrubs and flowers. These have to be used in proper conditions as well, with no rain in the forecast for two days to follow, air 60-80 degrees and no winds. Finally, non-selective post-emergence herbicides kill all types of weeds, and are best used to spot treat grassy weeds that are not affected by the selective herbicides.
So next time you see a Dandelion plant growing, don’t make a wish and blow the seeds toward in the direction of a lawn fanatic- they may not get the perfectly manicured lawn they wished for!
About The Author
Paul Duxbury is Head of Training for a major UK Charitable Organisation with a wealth of experience in personal development, management development, e-learning and operational management. In addition he owns PK eBooks (http://www.pk-ebooks.co.uk) and has just published a Create the Lawn You want! eBook which can be found at http://www.pk-ebooks.co.uk/create_your_dream_lawn.htm.
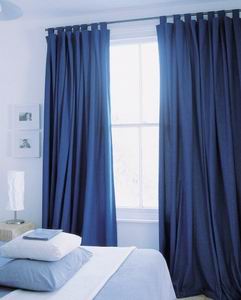
Curtains, Windows and Feng Shui
 Feng Shui is an ancient Chinese philosophy. It is the study of living in harmony and prosperity with nature. Feng Shui means literally "wind water". It is a form of geomancy, trying to understand the relationships between nature and ourselves so that we may live in harmony within our environment. It is based upon the simple thought that our lives are deeply affected by our physical and emotional environment.
One of our chief environments is our house, where we spend most of our time. Feng Shui has advice and solutions to offer, in order to let the "chi", the energy, flow smoothly around the house. Curtains and windows are the most prominent features of our homes. Fabrics, color, material, window arrangement, yes, all these may affect your homes chi. Let's see how to improve it.
· Pull the curtains back during daytime to allow sunlight to lighten your house and give the area positive energy.
· Keep your curtains closed at night. Don't leave your windows exposed into night as it is considered to bring bad luck.
· Blinds and curtain rings should be of natural material. The most beneficial is wood. Avoid plastic by all means!
· Curtains should be large enough to cover the window and long enough to reach the floor.
· Curtains should have curves to them. When drawn together there should be enough fabric hanging to form pleats and folds.
· Make sure that curtains open and close easily.
· Curtains that hang limply each side of a window are considered bad Feng Shui.
· Keep your curtains and windows clean in order to allow the chi to come inside fresh and clean.
· Match your curtains with the seasons to freshen up yours and your chis' mood. Use heavy fabrics for winter and lighter fabrics for summer. Utilize warm colours for wintertime and light happy colours for spring and summertime. Choose shades of green at spring, shades of red, orange and pink at summer, white, grey and metallic colours for autumn and shades of blue in winter.
· Windows are best when opening outwards. If a window opens inwards make sure it doesn't face the West, which is the direction that signifies death or ending. In that case, block negative chi with an outward facing mirror or a plant with round leaves.
· Octagonal and arched windows are considered good Feng Shui.
You can also utilize colours in your curtains to change colours in each room of your house, adjusting it correctly to specific energies each room should have. Have matching pairs in your bedroom and colours that invite love such as pink or green. For the diving room use red to keep guests energized and excited. For kitchens and playrooms orange and yellow is refreshing and revitalizing. Green is a calming colour ideal for living rooms. Purple signifies richness and transformation, which makes it ideal for spiritual rooms.
Whether you believe in Feng Shui or not, the best way to decorate your house and choose your curtain fabrics and colours is your personal taste and instinct. Add some positive Chi energy and you have the perfect house. Yours!
About The Author
Charles Kassotis
For more information on Curtains, Window Treatments and Using Feng Shui to bring the Positive Healing Powers of Chi to your Home, visit http://www.curtaincart.com today!
Trees in the Home Landscape
 Trees add so much to the home landscape! They provide shade, clean air, habitat for wildlife, value to your property, and even memories.
If your yard does not have any trees at the moment, you may want to consider planting some. Studies have shown that trees and landscaping add value to your property. Even if you do not intend to sell your property, trees can provide years of enjoyment. If you have trees in your yard, check to see that they are healthy. If they are near the end of their life expectancy or show signs of decline, you may want to plant new trees that will become established before the old trees are removed.
If properly located and planted, trees can help control energy costs. A large shade tree planted on the southwest side of the house can provide cooling shade in the summer, helping reduce air conditioning costs. Once the leaves drop in the fall, the winter sun is free to warm your house on cold winter days. Evergreen trees, planted to block cold winter winds, can help reduce winter heating costs.
Have you wondered what you could do to reduce greenhouse gases and address global warming? Planting trees will help! One of the greenhouse gases causing the most concern is carbon dioxide. Plants take this gas out of the air and use it in photosynthesis. Carbon is stored in the wood and living tissues of trees. When leaves fall and are composted, carbon is added to the soil. This improves the soil for plant growth and stores more of the carbon in the form of soil organic matter. Carbon can be stored for hundreds of years in the trunks of trees or in the form of lumber, furniture, and other wood products. By planting trees in your yard, you can help reduce greenhouse gases.
Trees also provide shelter and food for a variety of wildlife. While installing bird feeders will help attract birds to your yard, providing them with nearby trees and shrubs to escape danger, build nests, and obtain food, will be even more effective. Squirrels and other small mammals use trees for nesting sites and food sources. When selecting trees, consider what food value they may offer to the wildlife in your community.
Trees can offer years of enjoyment. Planting trees and watching them grow can be part of your family's memories. Consider planting a tree to commemorate a milestone in your family's life. While raking leaves may seem like a chore as you get older, jumping in piles of leaves can be a treat for children. Hanging a swing, building a tree house, or simply relaxing under the shade of a tree on a hot summer day can be a memorable experience.
About The Author
Paul Duxbury
Paul is Head of Training for a major UK Charitable Organisation with a wealth of experience in personal development, management development, e-learning and operational management. In addition he owns PK eBooks (http://www.pk-ebooks.co.uk) and has just published a Home Owners Guide to Landscaping eBook which can be found at http://www.pk-ebooks.co.uk/home_landscaping.htm.
pkmcr@pk-ebooks.co.uk
Bathroom Vanities - The Finishing Touch For Your Bathroom Makeover!
 Bathroom vanities come in a wide variety of different styles and finishes, so it can be tricky to choose one that will be just right for your bathroom’s new image. It helps if you have a general idea of the type of vanity unit you’re looking for. For instance, what’s the theme of your bathroom? There are bathroom vanity sets for period, country style and modern bathrooms, among others. In addition to choosing a vanity that looks good, practicality is also a consideration. Think about the best use of space for your bathroom’s layout. Bathroom vanities come in various sizes, including corner units, and can have built in storage cabinets under the sink to help you keep your counter tops tidy.
Bathroom vanity cabinets can be adapted to store all sorts of items. You could have shelving for linen, compartments for makeup or a door mounted racked to hold electrical appliances such as a hair dryer and shaver. Having a pull out trash can could help keep your bathroom floor clear. Whether you choose a contemporary base cabinet to stand on the floor, or a furniture style vanity with decorative legs depends on your personal preferences. There’s a range of stylish finishes to choose from as well, including distressed finishes for a simulated antique look, hand painted designs or glazed wood.
There are loads of different styles of sinks for bathroom sink vanity units, including porcelain, stainless steel and glass ones. Another thing to consider is the material for your counter tops, and whether you want a shiny polished finish or a matte look. Attention to detail such as matching the hardware to your other bathroom fixtures can help bring your bathroom’s new look together. The positioning of your bathroom vanity lighting also plays an important role in the overall look and feel of your room.
There are bathroom vanities and cabinets to suit bathrooms of all styles and sizes. With some thought and planning a new bathroom vanity set can become an attractive centerpiece to complete your bathroom’s makeover.
About The Author
Caroline Smith is a successful home furnishings writer and regular contributor to http://www.a1-bathrooms-showers.com - An online resource to help you find the very best bathroom vanities, shower doors, shower curtains and other essential bathroom accessories.
Finding A Reputable Moving Company
 Irrespective of where you are moving to, moving is made so much easier by doing some pre move planning.
When you moving it is a great time to itemize all of your belongings and throw out or sell the items that you no longer plan to use or want to keep. There is probably hundreds as everyone always has some. You can have yard sale or donate to a local charities.
if you intend on user a moving company then ask plenty of questions rates and results. If friends or neighbors have moved recently you might like to see if they will recommend a company.
One of the most important issues is availability and whether the company has a truck that will fit your belongings and whether they are free to move you on the day you need to move. Ask if their price is inclusive of boxes, tape, marking pens, dollies, and packing paper. Also ask if their quote includes travelling insurance.
Other questions to ask include:
1) Do they have membership to the American Moving and Storage Association
2) How long have they been in business?
3) Can they give you referrals?
4) Can they provide a detailed and itemized statement of to be performed?
Moving companies make their charges based on weight, distance, and services provided. You should ask if your quote includes any additional charges for person-hours, packing materials, travel time, and any waiting time (if you can't get into the property straight away). Ask what sort of payment methods the movers will accept and find out if you need to take out your own insurance.
Before selecting any insurance option, understand whether you will be reimbursed based on the extent of the damage and the item's depreciated value, or on your cost to replace the item. Also, be sure to check your homeowner's insurance for any moving damage coverage.
About The Author
York Packore is the developer for YP Moving, the best place on the web for resources on moving. For more information, go to: http://www.ypmoving.com.
3 Simple Ideas to Make Your Own Inexpensive Curtains
 When we decide to spruce up our house, one of the first things that come to mind is a curtain. There are many types of curtains on the market. Lots of fabrics, colors, designs and styles to chose from. But sometimes, regardless of the vast variety available, we simply can’t find what we’re looking for, and often times when we do, we can’t afford it.
The truth is, you don’t need anyone to do it for you; you are as capable as it takes, to do it yourself! Let’s see how we can become designers of our own space using basic tailoring techniques.
Let’s start by the most prominent, the material. The fabric. Choose a fabric that you like. Avoid quilted fabrics as they can stretch or shrink over time. Fibers like cotton and linen and especially those with polyester and micro fibers, hold up better than others. Also avoid silk or silk blends, because they tend to rot and fade very quickly. Make sure you buy enough fabric; you don’t want your curtains to look poor. Double height of the window and three times width, should be fine.
In this article, we will examine the three simplest sewing and hanging techniques for curtains.
For curtains with rings, you need to stitch an approximately 3-inch hem at the edge of the curtain panels that are going to be hung. Now, sew each ring to each curtain panel leaving small distances between the rings so that the curtain is pulled easily. You can also use clip-on rings that don’t need to be stitched and are easier to apply.
For tied tab curtains you will need to create the hangers. Simply stitch horizontal buttonholes at the top of the curtain panel. Now you can make the hangers using the same fabric as the curtains, or another but suitable fabric for a little diversity. Make threads and place through the buttonholes.
No Sew Curtains are also a smart and easy way to make curtains and decorate a window. In this case the fabric should be 3 inches more than double the height of the window and 2 inches more than the width of the window. Pull the fabric through the rod and fold evenly. Now stitch the two ends of the fabric at the bottom and at the sides together. When the curtain is ready, place a single fabric band in the center of the curtain or use two purchased tiebacks evenly spaced along the width of your window. Then adjust folds of fabric panel as desired.
Gather your supplies, fabric, scissors, screws, rings or ribbon, and use your imagination. In less than an hour you will manage to decorate that empty window effectively and inexpensively. But the most important thing is that you will have your own personal work to show off in your house.
About The Author
Charles Kassotis
Making Your Own Curtains Can Be Fun and Inexpensive! For More Information, Tips and Simple Step By Step Instructions, visit The Curtain Cart at www.curtaincart.com